> ## Documentation Index
> Fetch the complete documentation index at: https://docs.cogniagent.ai/llms.txt
> Use this file to discover all available pages before exploring further.
# Execution modes and lifecycle
> Choose how an application handles events across runs, and learn how executions start, stop, and finish.
Every time an application runs, it does so as an **execution** — a single
run of the workflow with its own history of events, node results, and
state. Two settings shape how executions behave: the application's
**execution mode** and the engine's built-in **lifecycle rules** that
decide when an execution is finished.
## Execution mode
Open the application settings (the gear icon at the bottom of the
canvas) to choose how events are grouped across runs.
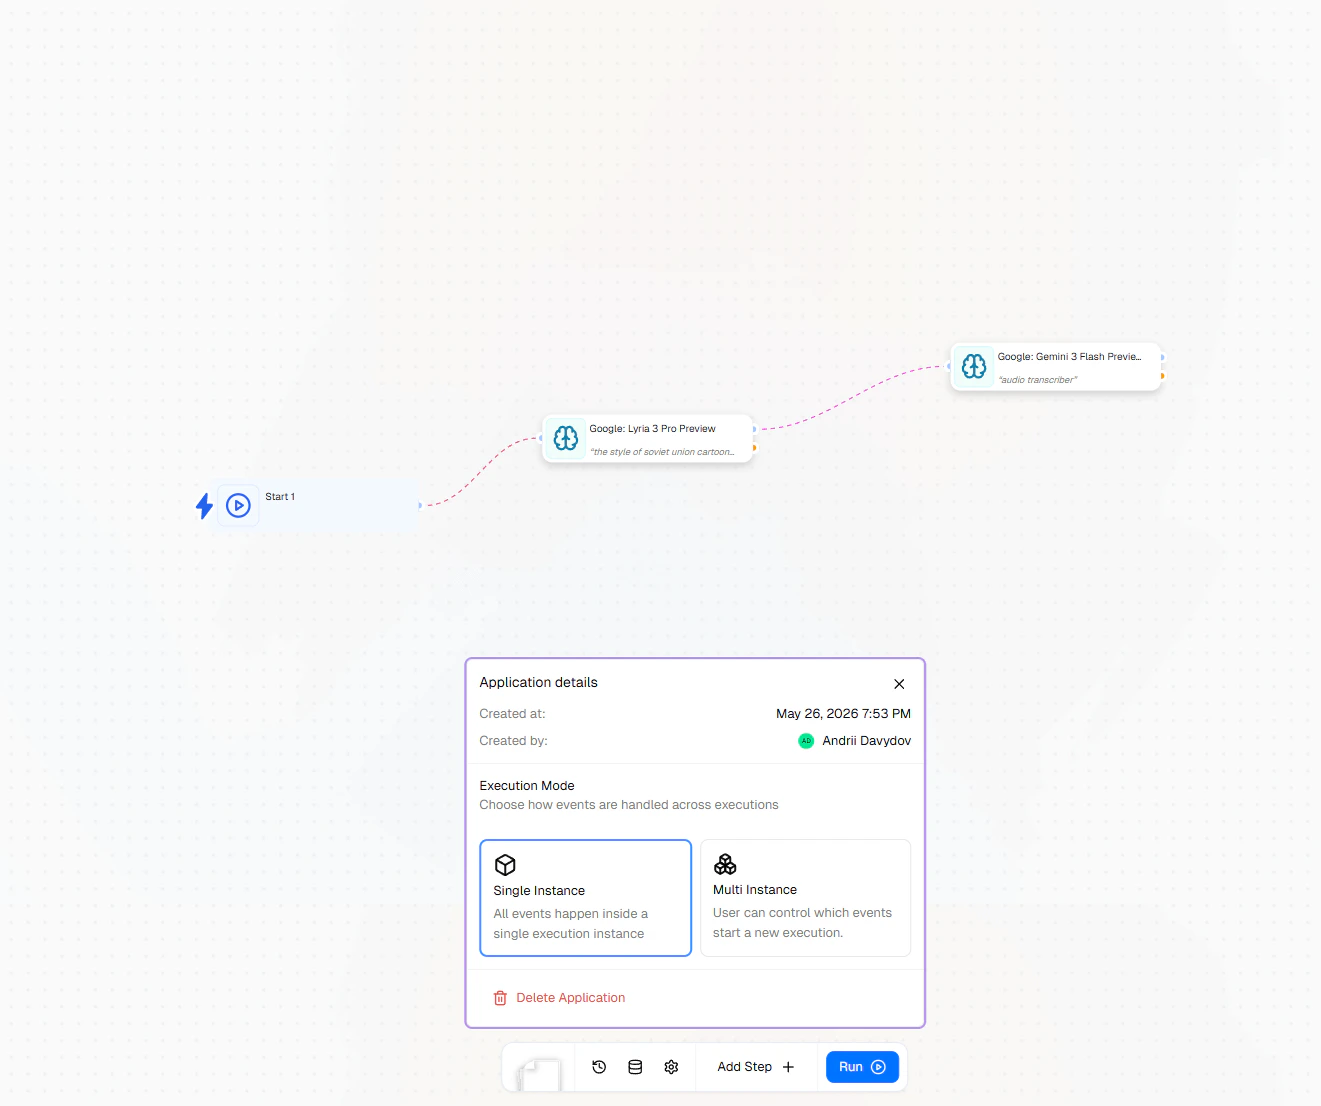 **Best for:** apps that act like a persistent listener — one Gmail
watcher, one webhook receiver, one scheduled poller.
All events arrive inside the **same** running execution. Triggers
route to the most recent running execution, so the history,
variables, and dispatcher conversations accumulate in one place.
Single instance is the default and works well for most automations.
**Best for:** apps where each incoming event should be tracked
separately — one execution per support ticket, per order, per
inbound call.
Triggers configured to start a new instance spawn a **fresh
execution** for every event. Each instance is fully independent —
its own history, its own variables, its own lifecycle.
Use multi instance when you want isolated runs you can audit or
reproduce individually.
The execution mode is a property of the application, not of an
individual run. Switching modes affects how *future* triggers are
routed; existing executions are unaffected.
## How an execution ends
An execution moves through one of four terminal states:
| Status | When it happens |
| ----------- | ---------------------------------------------------------------------- |
| `completed` | The workflow ran to the end of every branch and nothing else can fire. |
| `failed` | At least one node errored and no further work was possible. |
| `stopped` | You clicked **Stop Execution** in the toolbar. |
| `cancelled` | The execution was cancelled programmatically (rare; internal use). |
### Auto-stop
The engine watches each execution and stops it automatically when no
more work is possible. This keeps the execution list clean and frees
up resources — you don't have to click **Stop Execution** for every
finished run.
An execution auto-stops when **all** of the following are true:
* Every branch of the workflow has finished running.
* The graph has no node types that can receive new events later — no
triggers, webhooks, scheduled events, portal entry points,
dispatchers, or conversation-flow nodes.
* No queued jobs remain for this execution.
The final status is inferred from what happened during the run:
* **`completed`** — every node that ran succeeded.
* **`failed`** — one or more nodes failed.
Auto-stop runs the same cleanup as manual stop. Pipedream triggers,
scheduled cron jobs, channel pollers, and active dispatcher
conversations are all released before the execution is marked
terminal.
### Manual stop
Click **Stop Execution** in the bottom toolbar to halt a running
execution immediately. The execution is marked `stopped` and the
engine performs the same cleanup as auto-stop.
Stopping an execution does not undo the work that already happened —
emails that were sent stay sent, records that were written stay
written. Stop ends the run; it does not roll it back.
## Viewing executions
The bottom toolbar exposes the execution history and live event log.
Click the **Execution History** icon in the bottom toolbar to open
the executions list. Each row is one run of the application, with
its status, start time, and duration.
**Best for:** apps that act like a persistent listener — one Gmail
watcher, one webhook receiver, one scheduled poller.
All events arrive inside the **same** running execution. Triggers
route to the most recent running execution, so the history,
variables, and dispatcher conversations accumulate in one place.
Single instance is the default and works well for most automations.
**Best for:** apps where each incoming event should be tracked
separately — one execution per support ticket, per order, per
inbound call.
Triggers configured to start a new instance spawn a **fresh
execution** for every event. Each instance is fully independent —
its own history, its own variables, its own lifecycle.
Use multi instance when you want isolated runs you can audit or
reproduce individually.
The execution mode is a property of the application, not of an
individual run. Switching modes affects how *future* triggers are
routed; existing executions are unaffected.
## How an execution ends
An execution moves through one of four terminal states:
| Status | When it happens |
| ----------- | ---------------------------------------------------------------------- |
| `completed` | The workflow ran to the end of every branch and nothing else can fire. |
| `failed` | At least one node errored and no further work was possible. |
| `stopped` | You clicked **Stop Execution** in the toolbar. |
| `cancelled` | The execution was cancelled programmatically (rare; internal use). |
### Auto-stop
The engine watches each execution and stops it automatically when no
more work is possible. This keeps the execution list clean and frees
up resources — you don't have to click **Stop Execution** for every
finished run.
An execution auto-stops when **all** of the following are true:
* Every branch of the workflow has finished running.
* The graph has no node types that can receive new events later — no
triggers, webhooks, scheduled events, portal entry points,
dispatchers, or conversation-flow nodes.
* No queued jobs remain for this execution.
The final status is inferred from what happened during the run:
* **`completed`** — every node that ran succeeded.
* **`failed`** — one or more nodes failed.
Auto-stop runs the same cleanup as manual stop. Pipedream triggers,
scheduled cron jobs, channel pollers, and active dispatcher
conversations are all released before the execution is marked
terminal.
### Manual stop
Click **Stop Execution** in the bottom toolbar to halt a running
execution immediately. The execution is marked `stopped` and the
engine performs the same cleanup as auto-stop.
Stopping an execution does not undo the work that already happened —
emails that were sent stay sent, records that were written stay
written. Stop ends the run; it does not roll it back.
## Viewing executions
The bottom toolbar exposes the execution history and live event log.
Click the **Execution History** icon in the bottom toolbar to open
the executions list. Each row is one run of the application, with
its status, start time, and duration.
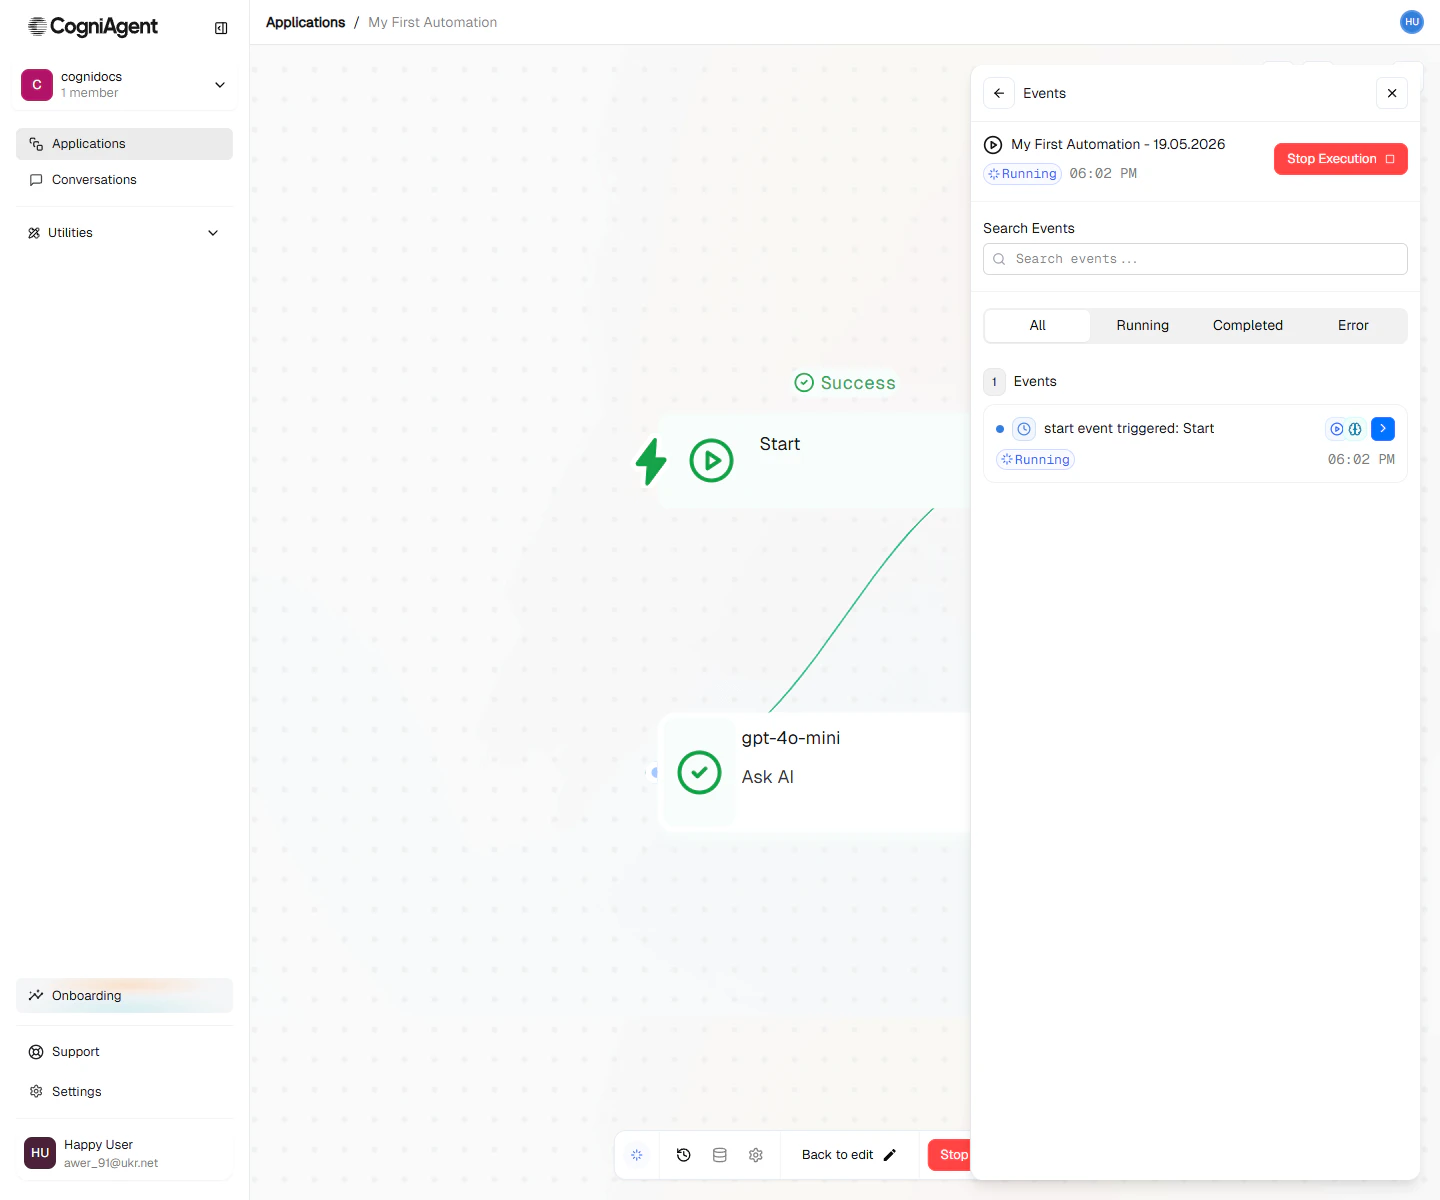
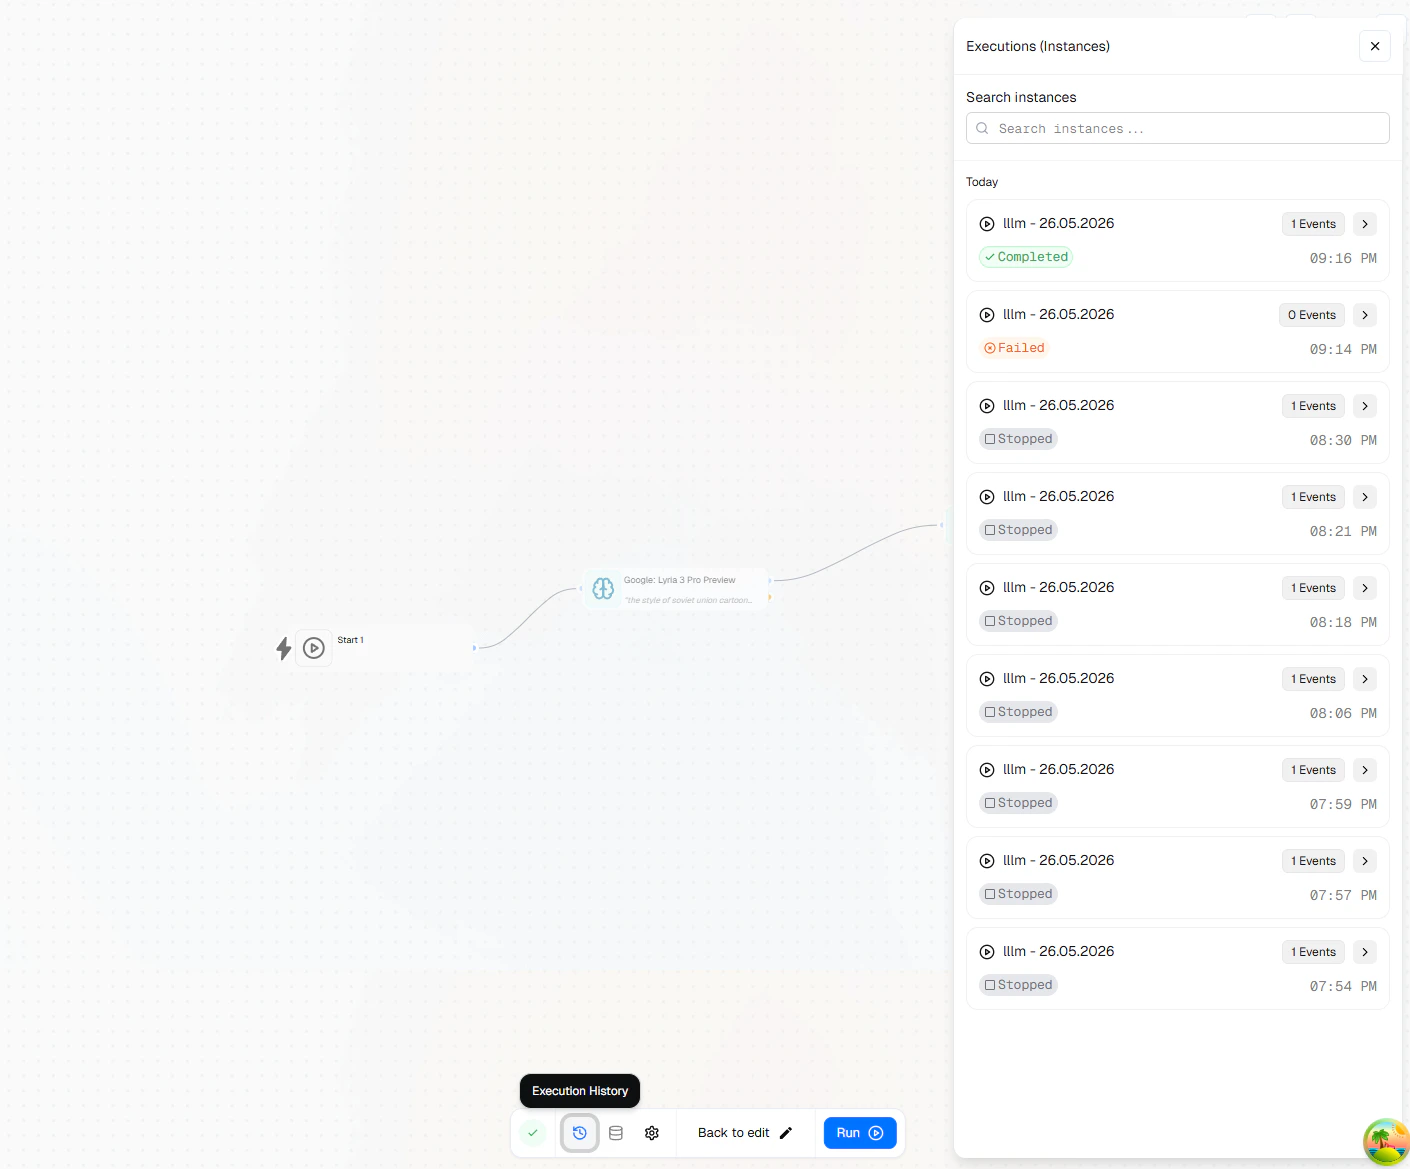 Pick an execution to drill into its event timeline — every node that
started, finished, or failed, in the order it happened. Filter by
`Running`, `Completed`, or `Error`, or search by name to find a
specific event.
Pick an execution to drill into its event timeline — every node that
started, finished, or failed, in the order it happened. Filter by
`Running`, `Completed`, or `Error`, or search by name to find a
specific event.
 ## Choosing between modes
* Your app reacts to a stream of events that don't need to be
tracked separately ("notify me whenever a new lead comes in").
* You want a single timeline of activity across all events.
* You want lower overhead — only one execution is ever active.
* Each incoming event represents an independent unit of work
("process this order from start to finish").
* You need isolated history per event for auditing or debugging.
* Different events should be able to fail independently without
affecting each other.
## Next steps
Walk through starting an execution end-to-end.
See which trigger types can spawn or feed an execution.
## Choosing between modes
* Your app reacts to a stream of events that don't need to be
tracked separately ("notify me whenever a new lead comes in").
* You want a single timeline of activity across all events.
* You want lower overhead — only one execution is ever active.
* Each incoming event represents an independent unit of work
("process this order from start to finish").
* You need isolated history per event for auditing or debugging.
* Different events should be able to fail independently without
affecting each other.
## Next steps
Walk through starting an execution end-to-end.
See which trigger types can spawn or feed an execution.