> ## Documentation Index
> Fetch the complete documentation index at: https://docs.cogniagent.ai/llms.txt
> Use this file to discover all available pages before exploring further.
# Quickstart
> Build your first multi-agent conversation flow in 10 minutes — Triage agent that hands off to two specialists.
In this quickstart you'll build a small **Sales Triage** flow with three AI agents: a Triage agent that figures out what the user wants, then hands off to a Product Specialist or a Pricing Specialist. The exact flow used as the running example in the rest of these docs.
## Before you start
* A CogniAgent workspace. If you don't have one, [sign up](https://cogniagent.ai).
* About 10 minutes.
You don't need to connect any integrations or set up a knowledge base for this quickstart. The flow runs end-to-end on the built-in model.
## 1. Create the flow
From the sidebar, click **Conversations**. You land on the flow list.
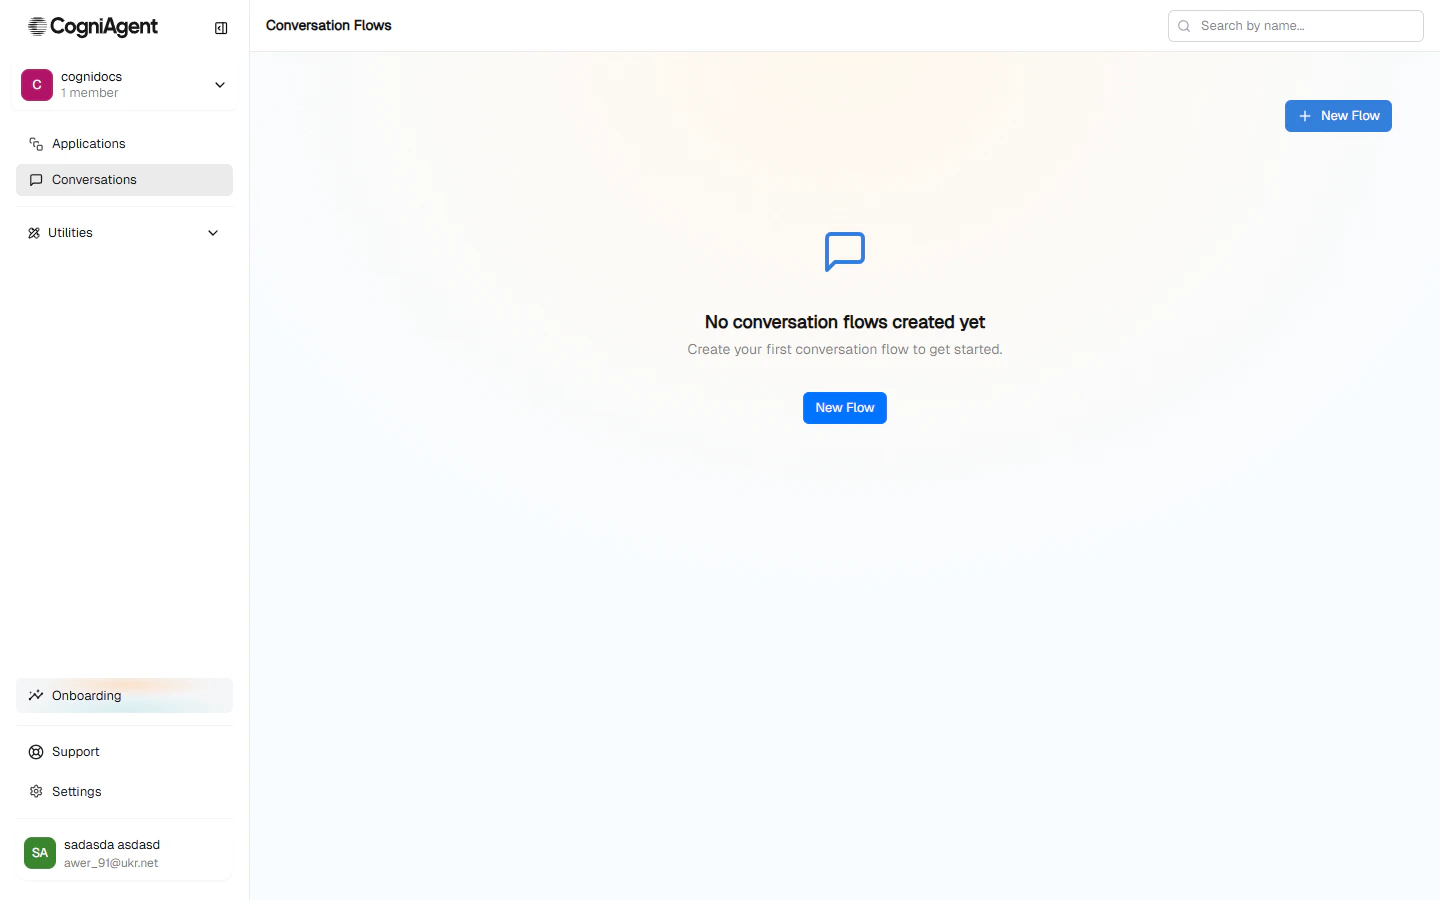 A blank flow opens straight away — no modal, no questions. You start on a canvas with a single **Start** node and an "Add Actor" button.
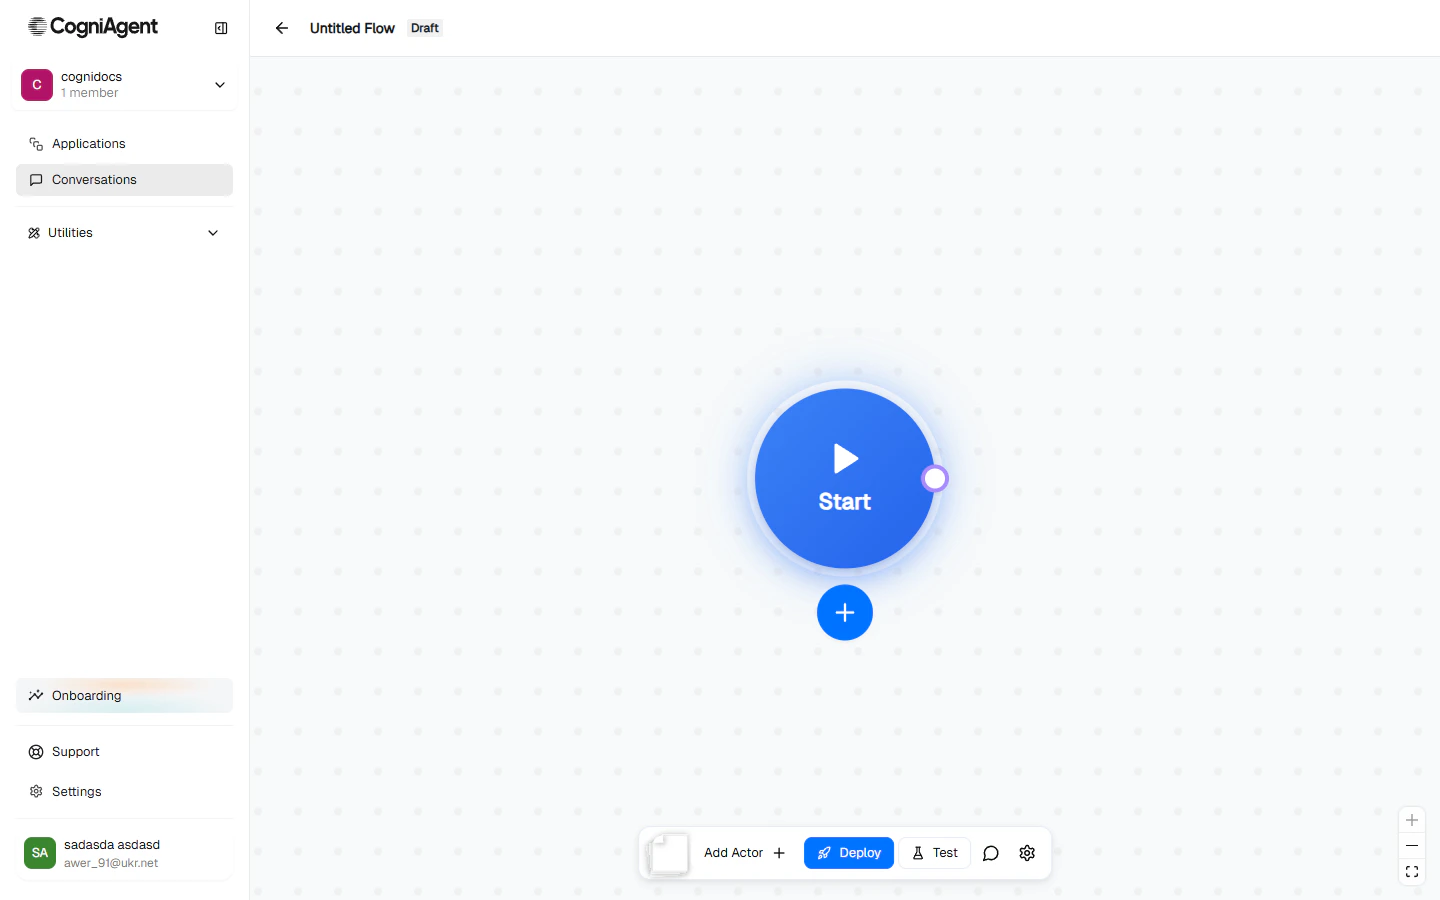 Double-click the **Untitled Flow** title at the top and rename it to `Sales Triage`. Press Enter.
## 2. Set the global context
Global context is shared knowledge every agent inherits — your company name, product names, tone of voice. Setting it once means you don't have to repeat it on every agent.
Click the **gear icon** (Flow settings) in the bottom-right toolbar.
Under **Global Context**, paste:
```
You work for Acme Inc., a SaaS platform that sells two products:
- Acme Pro — a self-serve workflow builder, $49/seat/month, 14-day free trial.
- Acme Enterprise — adds SSO, SLAs, a dedicated success manager, and audit
logs. Custom pricing, annual contract.
Always be friendly, concise, and professional.
```
Double-click the **Untitled Flow** title at the top and rename it to `Sales Triage`. Press Enter.
## 2. Set the global context
Global context is shared knowledge every agent inherits — your company name, product names, tone of voice. Setting it once means you don't have to repeat it on every agent.
Click the **gear icon** (Flow settings) in the bottom-right toolbar.
Under **Global Context**, paste:
```
You work for Acme Inc., a SaaS platform that sells two products:
- Acme Pro — a self-serve workflow builder, $49/seat/month, 14-day free trial.
- Acme Enterprise — adds SSO, SLAs, a dedicated success manager, and audit
logs. Custom pricing, annual contract.
Always be friendly, concise, and professional.
```
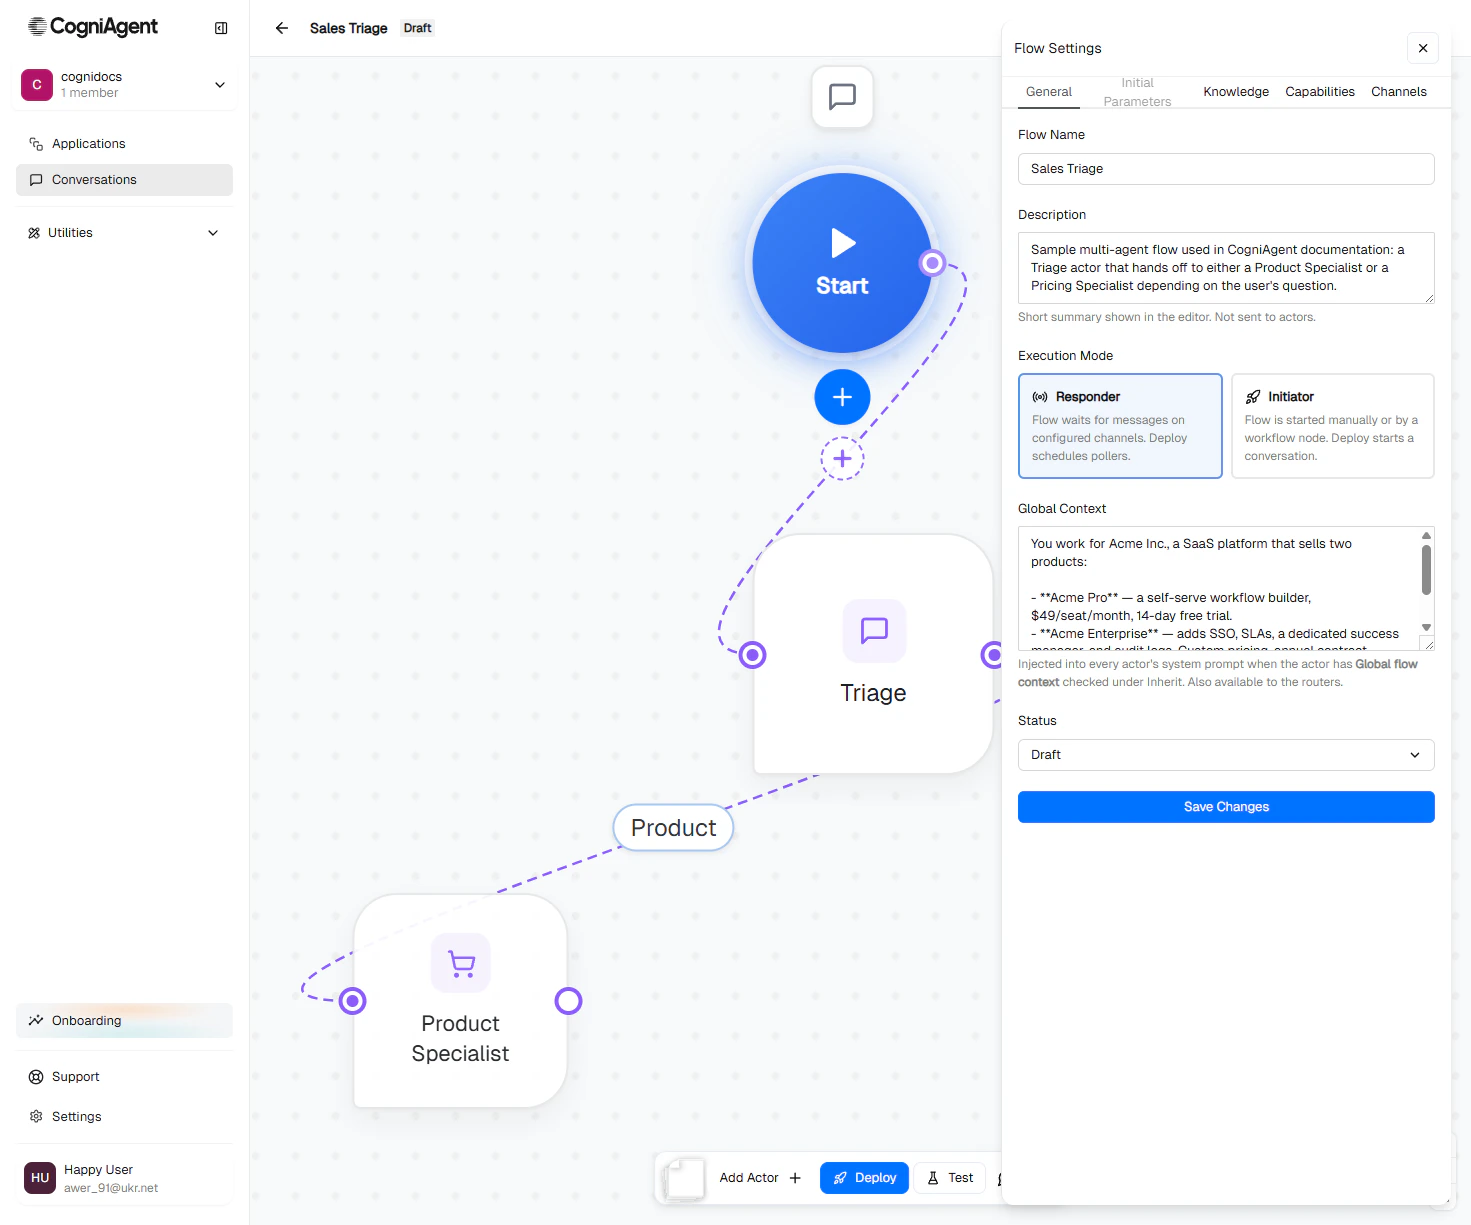 Click **Save Changes**, then close the panel.
## 3. Add the Triage agent
In the bottom toolbar, click **Add Actor**. Type `Triage` as the name and click **Create**.
Click **Save Changes**, then close the panel.
## 3. Add the Triage agent
In the bottom toolbar, click **Add Actor**. Type `Triage` as the name and click **Create**.
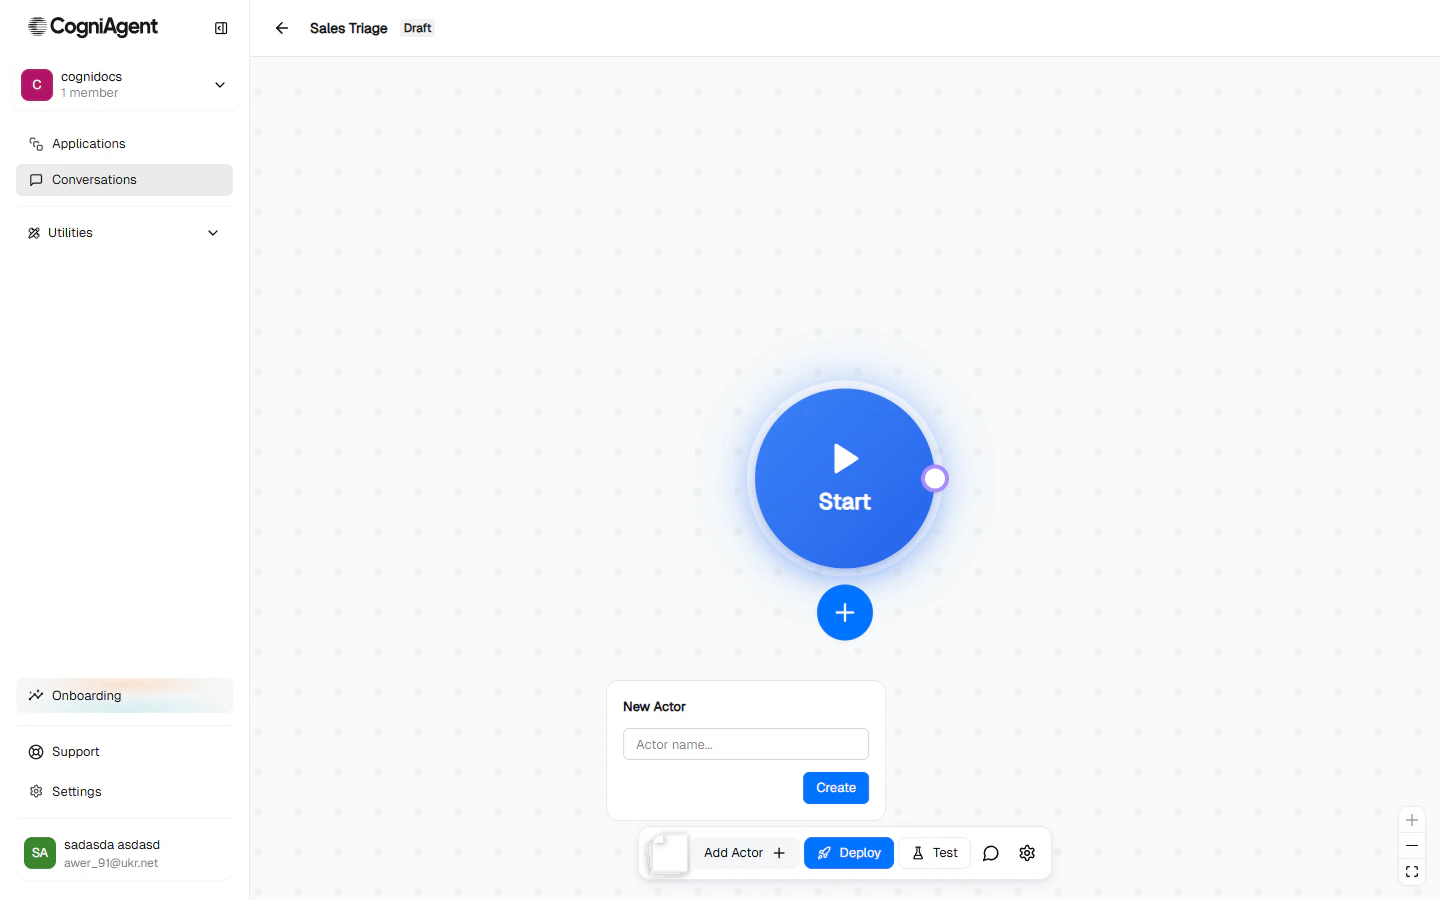 The Triage agent appears on the canvas, automatically connected from the Start node.
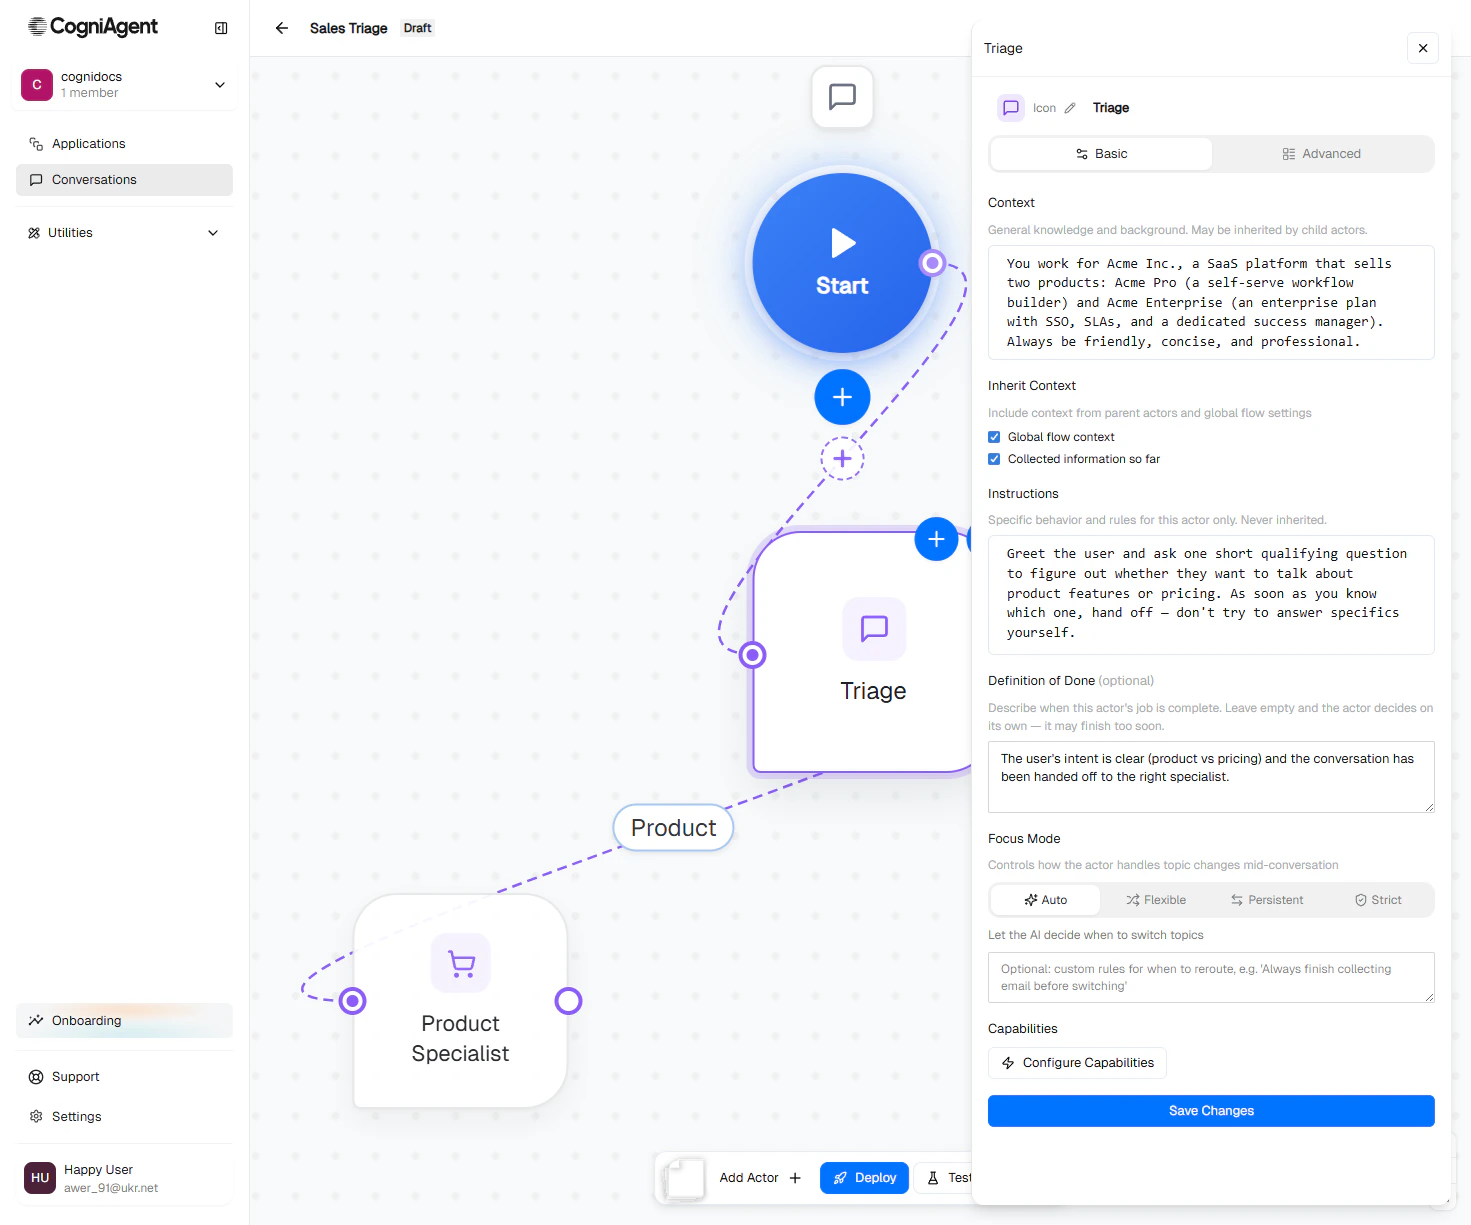
Click the Triage agent. The config panel opens on the right.
| Field | What to write |
| ---------------------- | ------------------------------------------------------------------------------------------------------------------------------------------------------------------------------------------------------------------- |
| **Context** | Leave empty — the agent inherits the global context. |
| **Instructions** | `Greet the user and ask one short qualifying question to figure out whether they want to talk about product features or pricing. As soon as you know which one, hand off — don't try to answer specifics yourself.` |
| **Definition of Done** | `The user's intent is clear (product vs pricing) and the conversation has been handed off to the right specialist.` |
The Triage agent appears on the canvas, automatically connected from the Start node.
Click the Triage agent. The config panel opens on the right.
| Field | What to write |
| ---------------------- | ------------------------------------------------------------------------------------------------------------------------------------------------------------------------------------------------------------------- |
| **Context** | Leave empty — the agent inherits the global context. |
| **Instructions** | `Greet the user and ask one short qualifying question to figure out whether they want to talk about product features or pricing. As soon as you know which one, hand off — don't try to answer specifics yourself.` |
| **Definition of Done** | `The user's intent is clear (product vs pricing) and the conversation has been handed off to the right specialist.` |
 Click **Save Changes**.
## 4. Add two specialist agents
Repeat the **Add Actor** flow twice — once for each specialist.
| Field | What to write |
| ---------------- | ---------------------------------------------------------------------------------------------------------------------------- |
| **Name** | Product Specialist |
| **Instructions** | `Answer product questions in clear, plain language. If the user asks about pricing or plans, hand off — don't quote prices.` |
| Field | What to write |
| ---------------------- | ------------------------------------------------------------------------------------------------------------------------------------------------------- |
| **Name** | Pricing Specialist |
| **Instructions** | `Answer pricing questions plainly. If the user asks about deep product features that aren't pricing-related, hand off — don't try to spec the product.` |
| **Definition of Done** | `The user has a clear answer about pricing or has been booked for an Enterprise quote call.` |
After both are created, your canvas has four nodes. They're auto-wired from the Start node — we'll fix the routing next.
## 5. Wire the routing edges
You want this topology: **Start → Triage → (Product Specialist or Pricing Specialist)**, with Triage deciding which specialist takes over.
Click the line connecting **Start** to **Product Specialist**. Press Delete (or use the delete affordance). Do the same for Start → Pricing Specialist.
Hover over the Triage node's bottom edge. A handle appears. Drag from the handle onto the Product Specialist node. An edge appears.
Click the new edge. The **Activation Condition** panel opens. Paste:
> When the user asks about product features, integrations, capabilities, security, the roadmap, or how something works in the product.
Click **Save Changes**.
## 4. Add two specialist agents
Repeat the **Add Actor** flow twice — once for each specialist.
| Field | What to write |
| ---------------- | ---------------------------------------------------------------------------------------------------------------------------- |
| **Name** | Product Specialist |
| **Instructions** | `Answer product questions in clear, plain language. If the user asks about pricing or plans, hand off — don't quote prices.` |
| Field | What to write |
| ---------------------- | ------------------------------------------------------------------------------------------------------------------------------------------------------- |
| **Name** | Pricing Specialist |
| **Instructions** | `Answer pricing questions plainly. If the user asks about deep product features that aren't pricing-related, hand off — don't try to spec the product.` |
| **Definition of Done** | `The user has a clear answer about pricing or has been booked for an Enterprise quote call.` |
After both are created, your canvas has four nodes. They're auto-wired from the Start node — we'll fix the routing next.
## 5. Wire the routing edges
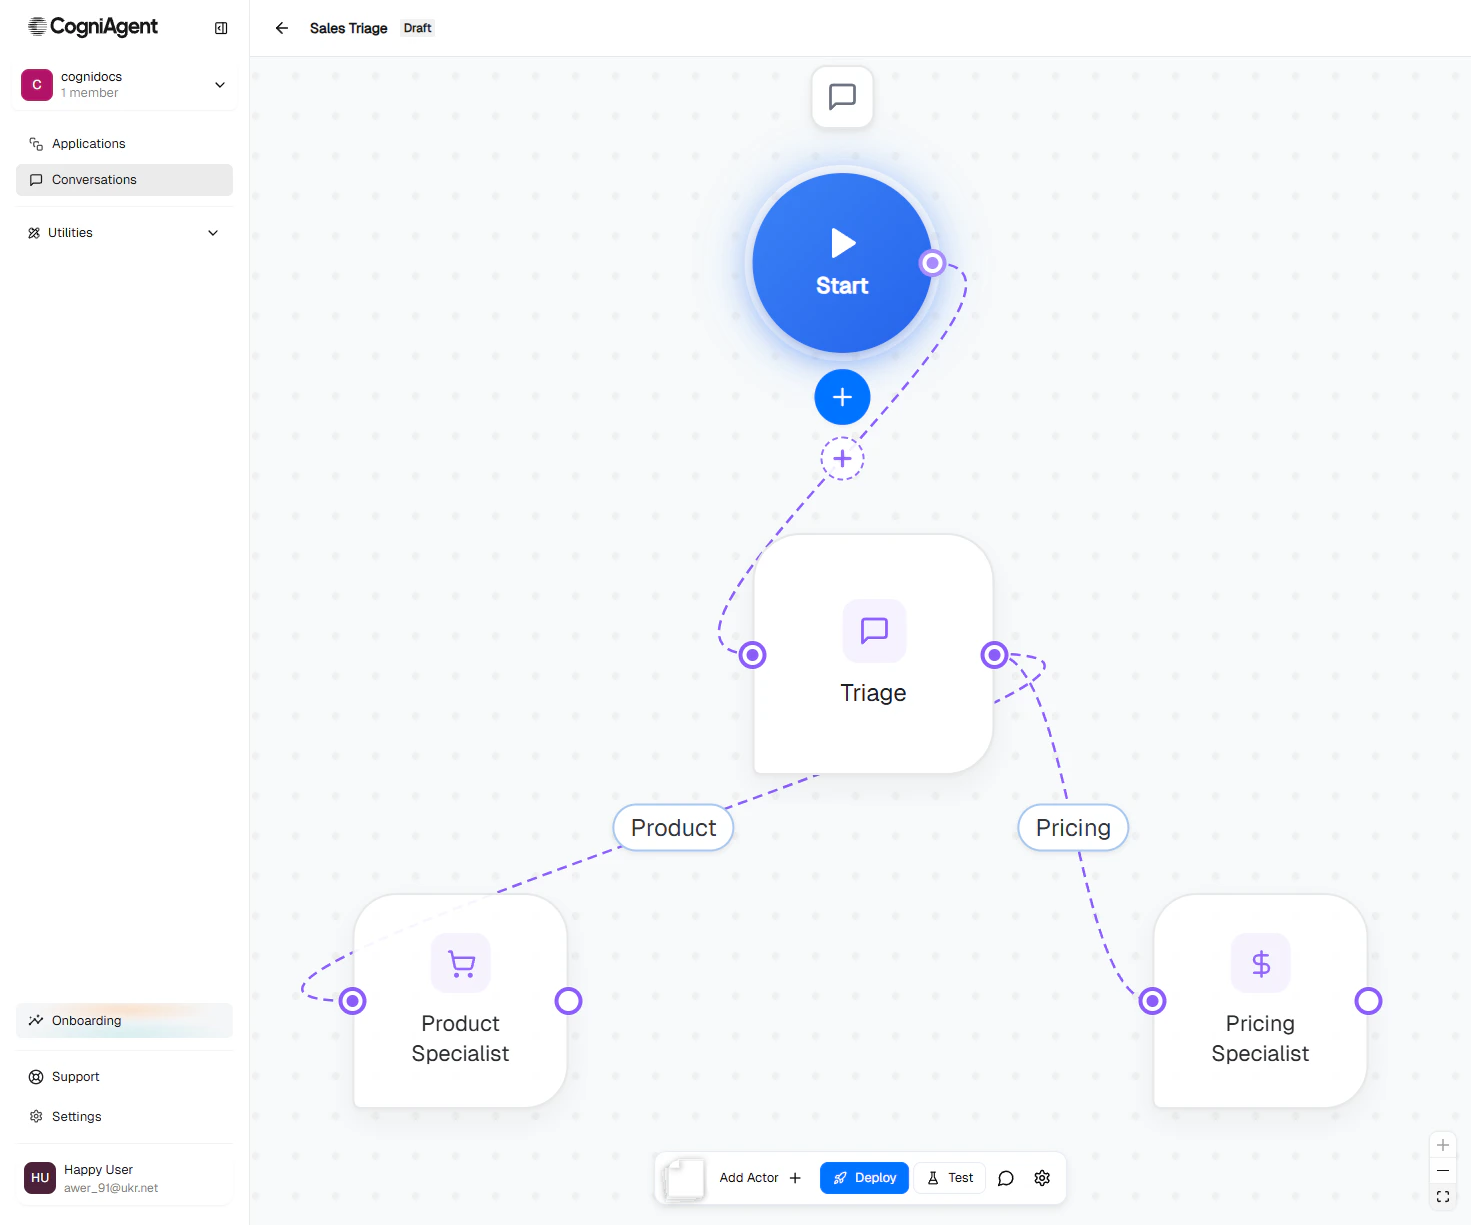
You want this topology: **Start → Triage → (Product Specialist or Pricing Specialist)**, with Triage deciding which specialist takes over.
Click the line connecting **Start** to **Product Specialist**. Press Delete (or use the delete affordance). Do the same for Start → Pricing Specialist.
Hover over the Triage node's bottom edge. A handle appears. Drag from the handle onto the Product Specialist node. An edge appears.
Click the new edge. The **Activation Condition** panel opens. Paste:
> When the user asks about product features, integrations, capabilities, security, the roadmap, or how something works in the product.
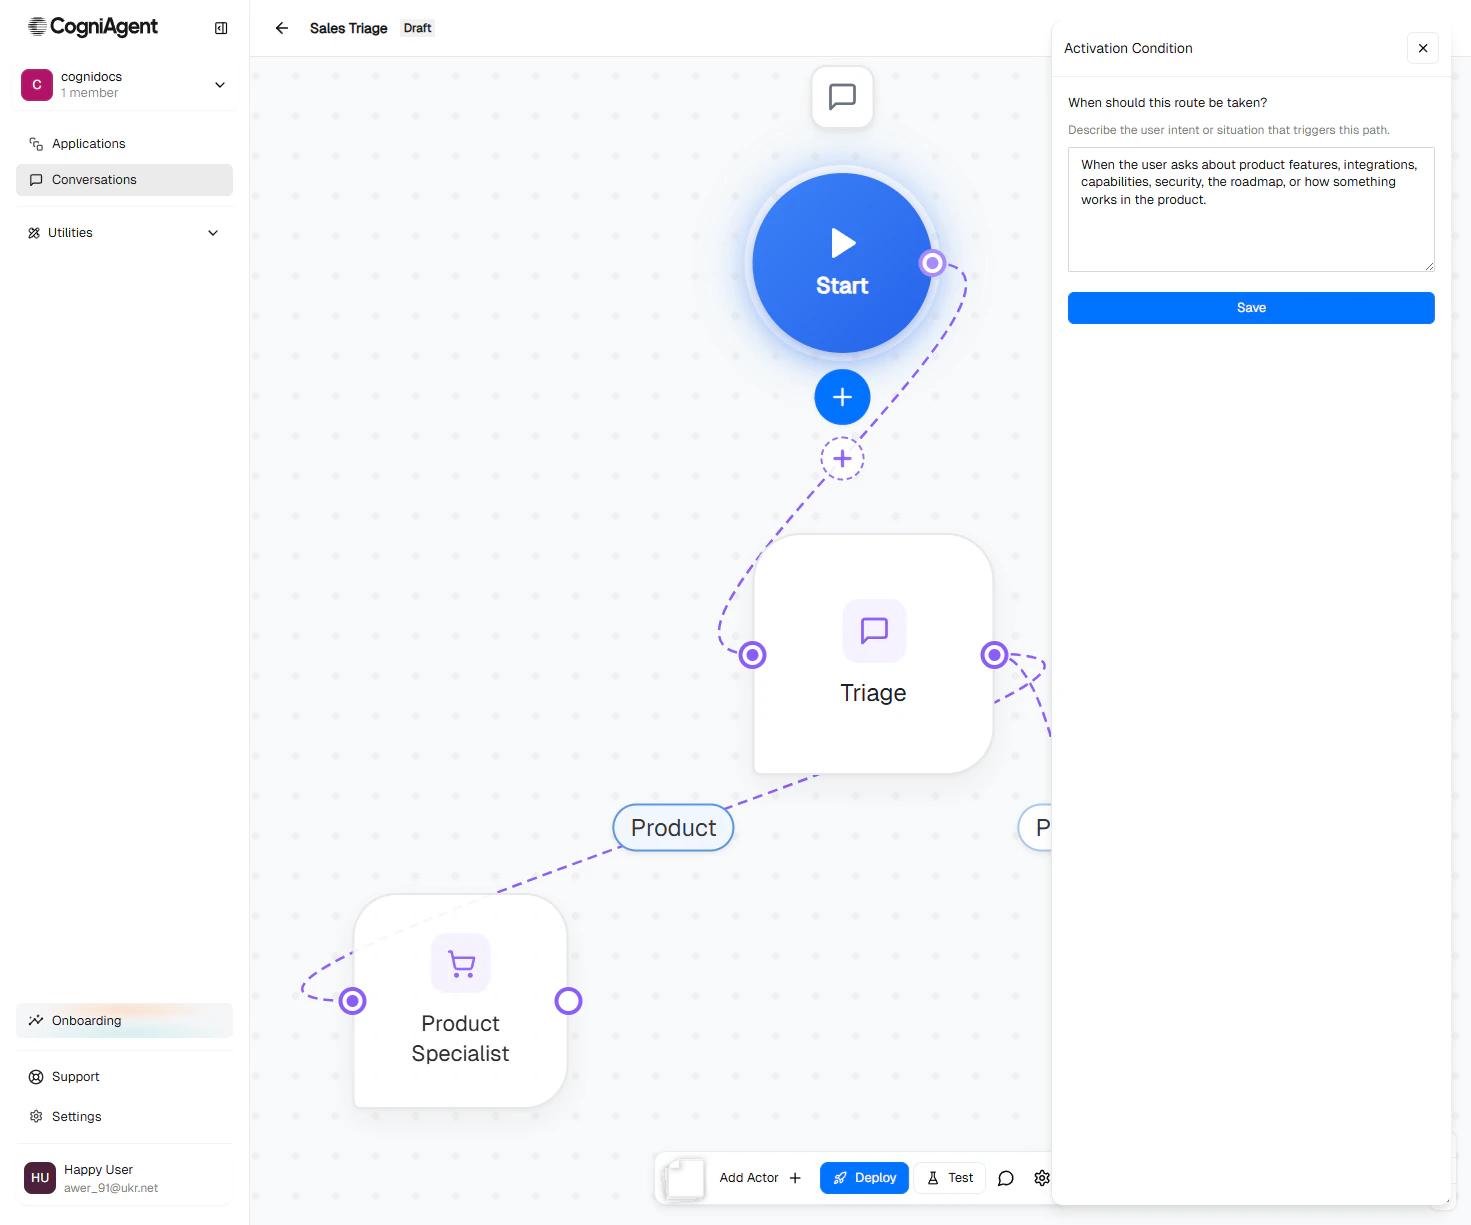 Click **Save**. A short label appears on the edge — generated by AI from your prompt.
Draw an edge Triage → Pricing Specialist, click it, paste:
> When the user asks about price, plans, seats, discounts, free trial, or wants a quote for an Enterprise contract.
Save.
Your canvas now looks like this:
Click **Save**. A short label appears on the edge — generated by AI from your prompt.
Draw an edge Triage → Pricing Specialist, click it, paste:
> When the user asks about price, plans, seats, discounts, free trial, or wants a quote for an Enterprise contract.
Save.
Your canvas now looks like this:
 ## 6. Test it
Click **Test** in the bottom toolbar. A drawer opens with a chat input.
Type `how much does Acme Pro cost?` and press Enter.
Within a couple of seconds, the **Pricing Specialist** replies with the pricing details from your global context. Below the reply, a **debug** panel shows the routing trace:
* `[global] routeToActor → Triage` (the global router picked Triage)
* `[branch] routeToChild → Pricing Specialist` (Triage handed off to Pricing because the activation prompt matched)
## 6. Test it
Click **Test** in the bottom toolbar. A drawer opens with a chat input.
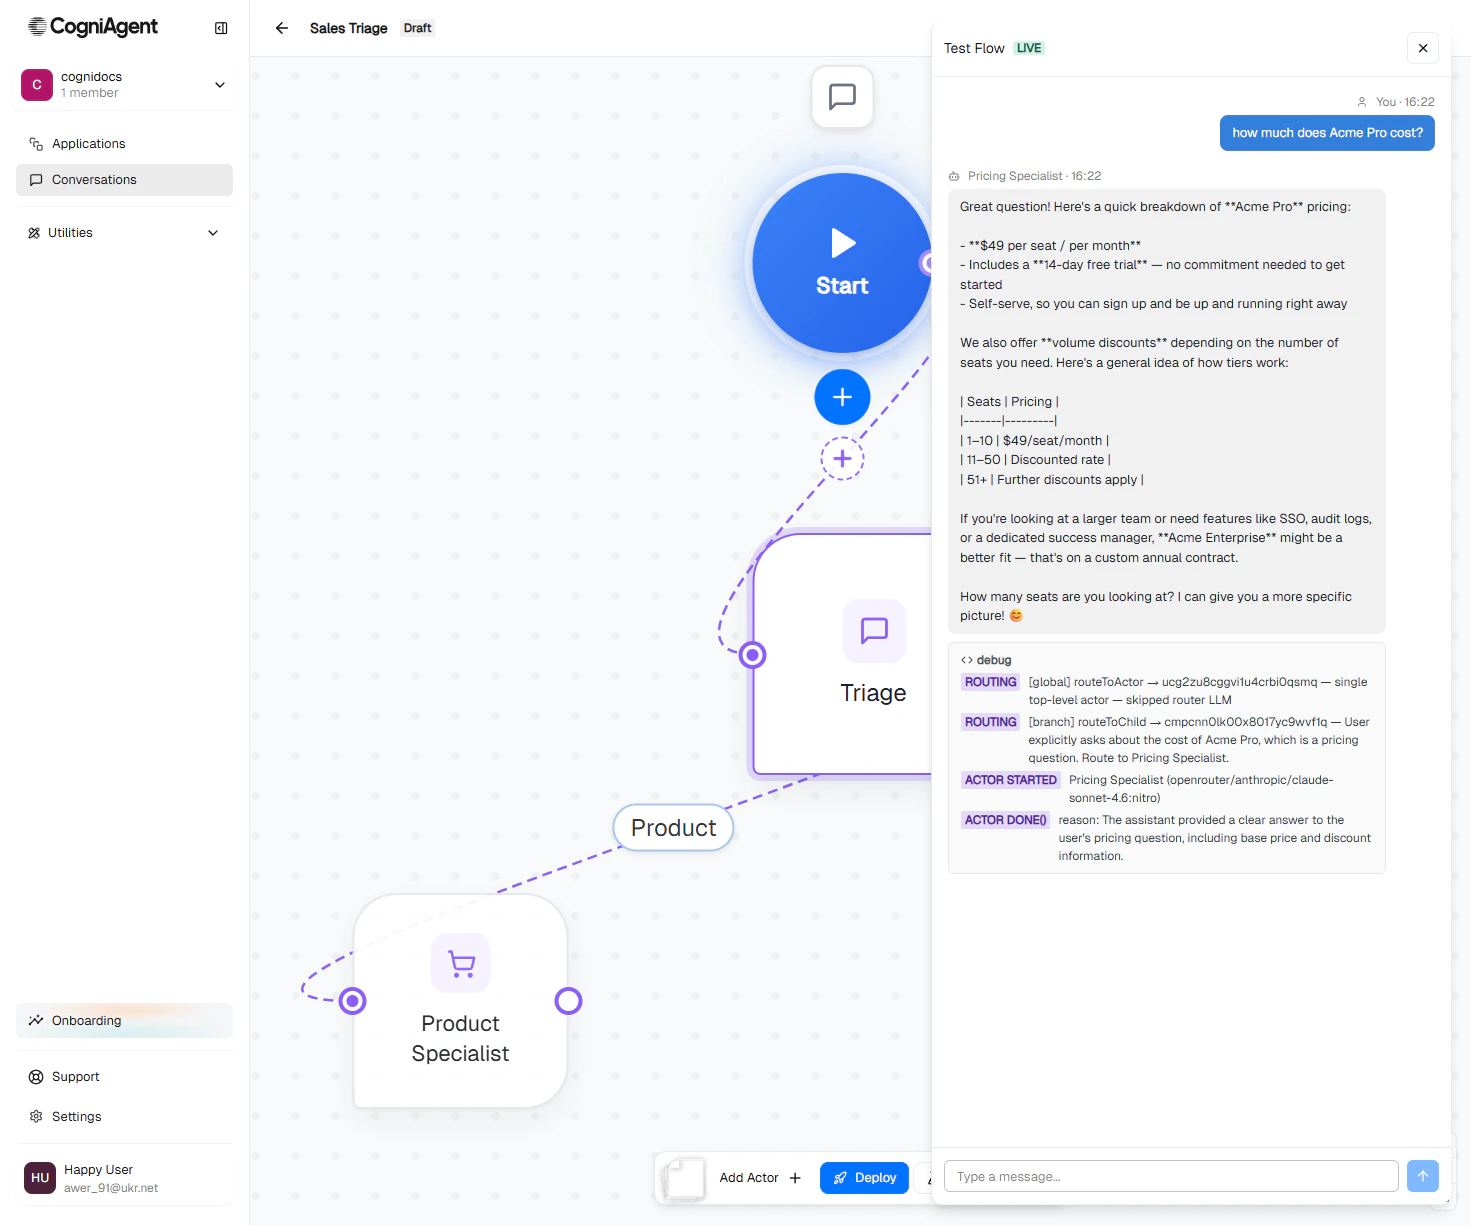
Type `how much does Acme Pro cost?` and press Enter.
Within a couple of seconds, the **Pricing Specialist** replies with the pricing details from your global context. Below the reply, a **debug** panel shows the routing trace:
* `[global] routeToActor → Triage` (the global router picked Triage)
* `[branch] routeToChild → Pricing Specialist` (Triage handed off to Pricing because the activation prompt matched)
 Type `actually, does it support SSO?` and watch how routing handles a topic change mid-conversation.
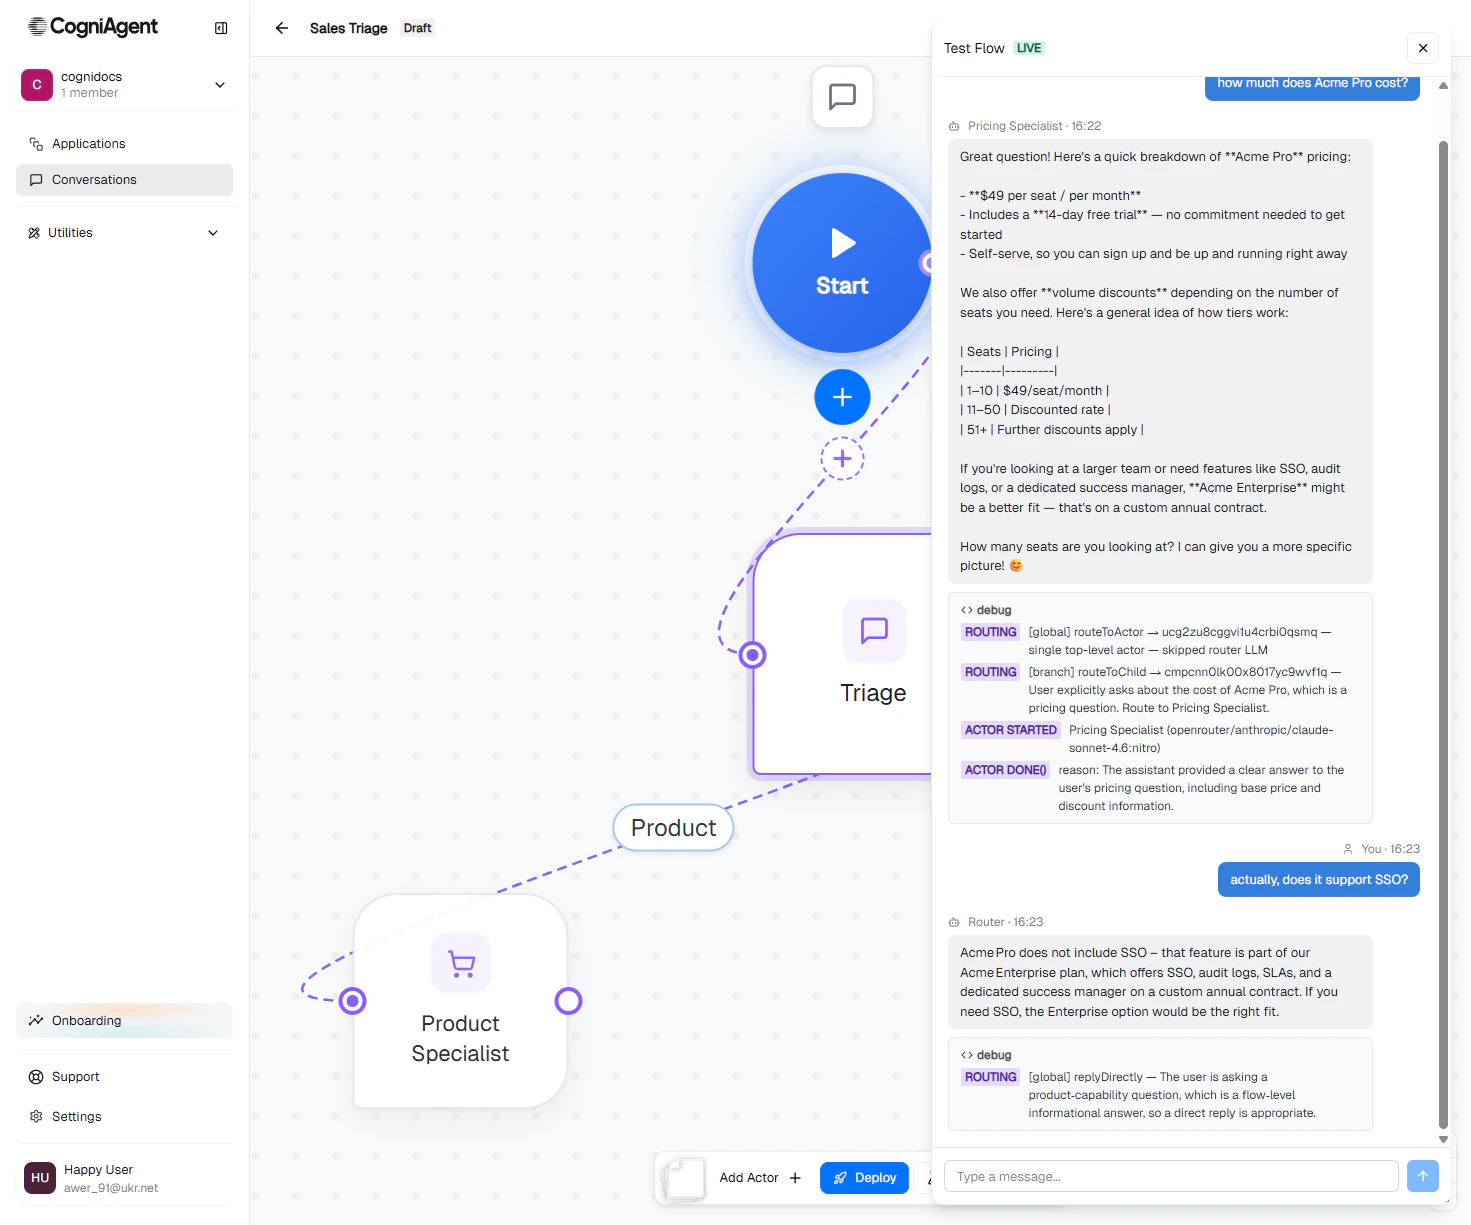 Every test message is logged in **Conversations** (bottom toolbar) with the full transcript, routing decisions, and any tool calls — useful for debugging later.
## What's next
You have a working multi-agent flow. From here you can:
Wire the flow to a Widget, Gmail, Slack, Teams, or Phone — so real users can talk to it.
Give your agents access to knowledge bases, integration actions, and custom tools.
Take it live so it can handle real inbound messages or outbound campaigns.
Understand actors, edges, context inheritance, and focus modes in depth.
Every test message is logged in **Conversations** (bottom toolbar) with the full transcript, routing decisions, and any tool calls — useful for debugging later.
## What's next
You have a working multi-agent flow. From here you can:
Wire the flow to a Widget, Gmail, Slack, Teams, or Phone — so real users can talk to it.
Give your agents access to knowledge bases, integration actions, and custom tools.
Take it live so it can handle real inbound messages or outbound campaigns.
Understand actors, edges, context inheritance, and focus modes in depth.