> ## Documentation Index
> Fetch the complete documentation index at: https://docs.cogniagent.ai/llms.txt
> Use this file to discover all available pages before exploring further.
# HTTP Request Node
> Connect to any website or service to send or receive data
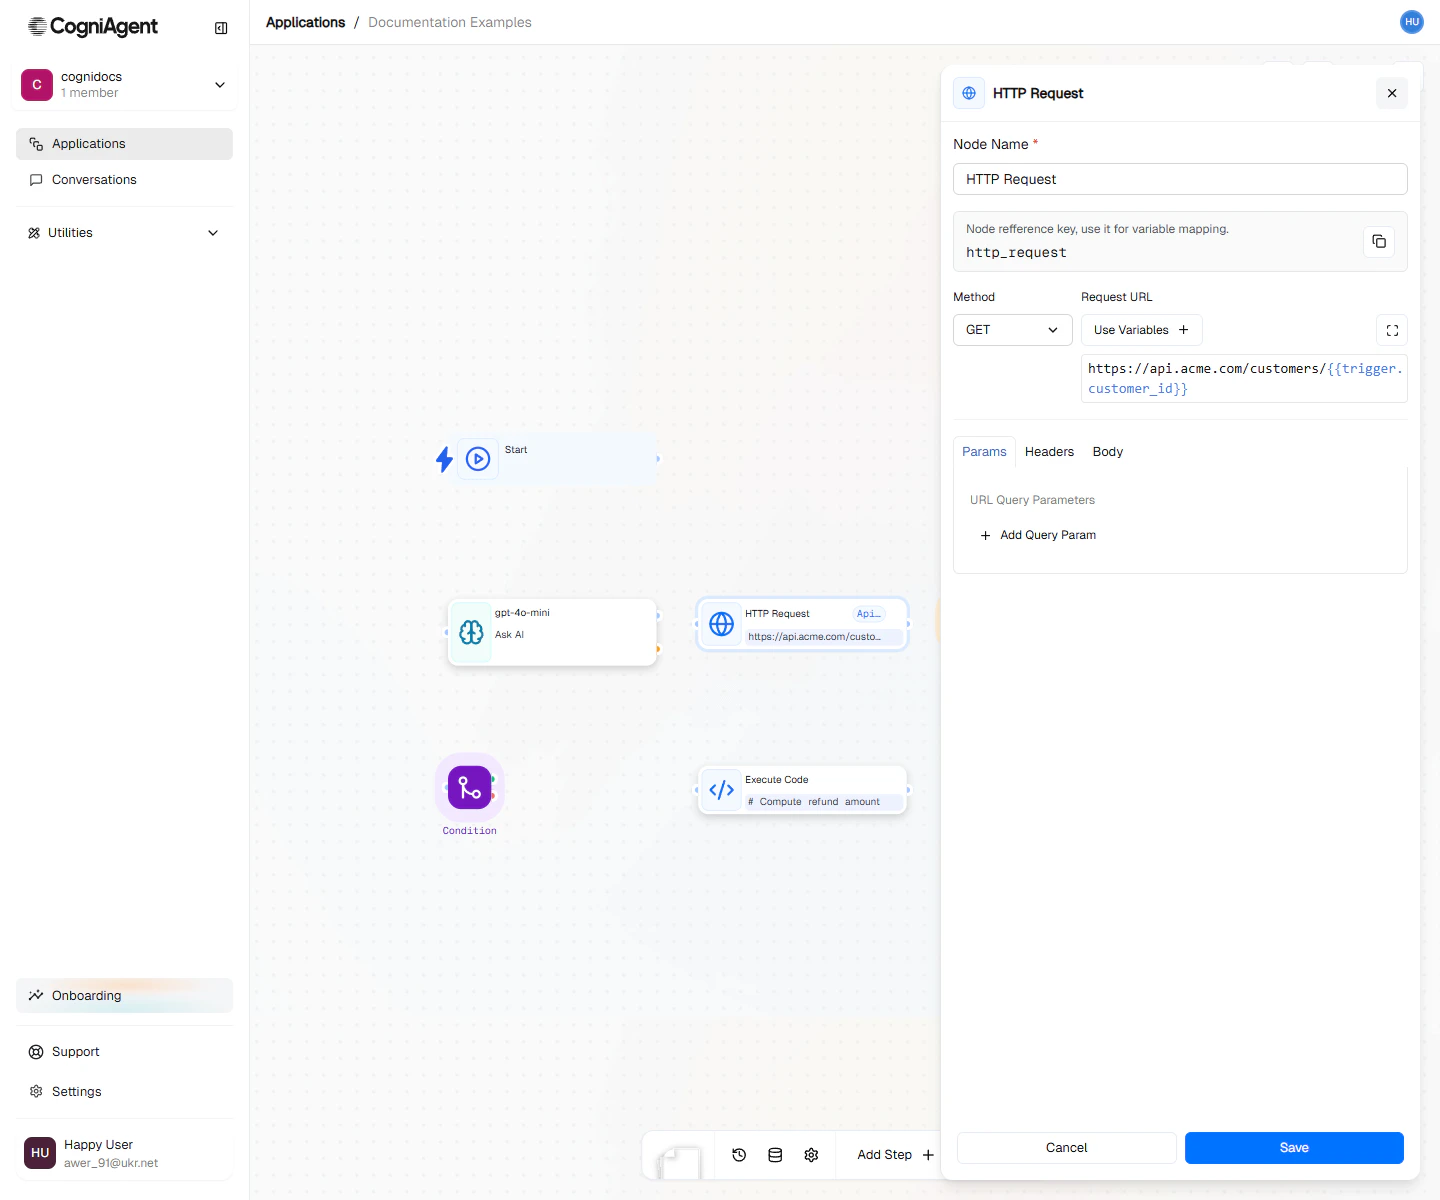
The HTTP Request node lets you connect to any website or online service. Use it when you need to get data from a website, send data somewhere, or connect to services that aren't in the built-in app list.
Think of it like opening a browser and going to a web address, but automated.
 ## When to Use
* **Services not in the app list** - Connect to any website or service
* **Your company's systems** - Connect to internal tools and databases
* **Advanced connections** - When you need precise control over how you connect
* **Sending data** - Push information to other systems
If you're connecting to Gmail, Slack, Google Sheets, or other popular apps, use [App Action](/nodes/actions/app-action) instead - it's much easier to set up.
## Example: REST API Integration
Query a customer API and process the results:
Add an HTTP Request node:
* Method: **GET**
* URL: `https://api.example.com/customers/{{webhook_1.body.customerId}}`
* Headers:
```json theme={null}
{
"Authorization": "Bearer {{secrets.API_KEY}}",
"Accept": "application/json"
}
```
Add a Condition node to check success:
```
{{http_request_1.statusCode}} == 200
```
Access response data in subsequent nodes:
```
Customer name: {{http_request_1.body.name}}
Email: {{http_request_1.body.email}}
Account tier: {{http_request_1.body.subscription.tier}}
```
## Example: POST with JSON Body
Create a record in an external system:
**Configuration:**
* Method: **POST**
* URL: `https://api.example.com/leads`
* Body type: **json**
* Body:
```json theme={null}
{
"name": "{{webhook_1.body.name}}",
"email": "{{webhook_1.body.email}}",
"source": "cogniagent_workflow",
"metadata": {
"campaign": "{{webhook_1.body.campaign}}",
"timestamp": "{{timestamp}}"
}
}
```
## Example: GraphQL Query
Query a GraphQL API:
**Configuration:**
* Method: **POST**
* URL: `https://api.example.com/graphql`
* Headers:
```json theme={null}
{
"Content-Type": "application/json",
"Authorization": "Bearer {{secrets.GRAPHQL_TOKEN}}"
}
```
* Body:
```json theme={null}
{
"query": "query GetUser($id: ID!) { user(id: $id) { name email orders { id total } } }",
"variables": {
"id": "{{webhook_1.body.userId}}"
}
}
```
**Accessing the response:**
```
Name: {{http_request_1.body.data.user.name}}
Order count: {{http_request_1.body.data.user.orders.length}}
```
## Example: File Upload
Upload a file using form data:
**Configuration:**
* Method: **POST**
* URL: `https://api.example.com/upload`
* Body type: **form**
* Body:
```json theme={null}
{
"file": "{{parse_file_1.fileContent}}",
"filename": "report.pdf",
"description": "Generated report"
}
```
## Logging In (Authentication)
Different services require different ways to prove you're allowed to connect.
### Using a Token (Most Common)
Many modern services give you a token - a long string of characters - to prove who you are:
```json theme={null}
{
"type": "bearer",
"token": "{{secrets.API_TOKEN}}"
}
```
### Using Username and Password
Some older services use traditional login:
```json theme={null}
{
"type": "basic",
"username": "{{secrets.API_USER}}",
"password": "{{secrets.API_PASS}}"
}
```
### Using an API Key
Some services give you a special key instead of a token:
```json theme={null}
{
"type": "apiKey",
"key": "X-API-Key",
"value": "{{secrets.API_KEY}}",
"in": "header"
}
```
## Error Handling
Always check the response status:
```
├── HTTP Request
├── Multi-Condition (based on statusCode)
│ ├── 200-299: Continue normal flow
│ ├── 400: Update Variable (bad request error)
│ ├── 401: External API (refresh token) → Retry
│ ├── 429: Pause (30s) → Retry
│ └── 500+: External API (alert team)
```
**Simple success check:**
```
├── HTTP Request
├── Condition (success == true)
│ ├── Met: Continue
│ └── Unmet: Handle error
```
## Response Parsing
### JSON (automatic)
If the response has `Content-Type: application/json`, it's automatically parsed:
```
{{http_request_1.body.data.items[0].name}}
```
### Raw Text
For non-JSON responses, body is a string:
```
{{http_request_1.body}}
```
Parse it in an Execute Code node if needed.
### Binary/Files
For binary responses, the body contains base64-encoded data. Use Execute Code to process.
## Retry Configuration
Configure retries for transient failures:
```json theme={null}
{
"maxRetries": 3,
"retryDelay": 1000,
"retryOn": [429, 500, 502, 503, 504]
}
```
Retries use exponential backoff by default: 1s, 2s, 4s...
## Best Practices
### Use Variables for URLs
```
# Good - configurable
https://{{env.API_HOST}}/api/v2/customers
# Avoid - hardcoded
https://api.production.example.com/api/v2/customers
```
### Store Secrets Securely
Never hardcode API keys in the URL or body. Use workspace secrets:
```
Authorization: Bearer {{secrets.MY_API_KEY}}
```
### Handle Rate Limits
Check for 429 status and implement backoff:
```
├── HTTP Request
├── Condition (statusCode == 429)
│ ├── Met: Pause ({{http_request_1.headers.retry-after * 1000}}) → Loop back
│ └── Unmet: Continue
```
### Validate Responses
Don't assume success. Check status codes and validate expected fields:
```python theme={null}
# In Execute Code node
response = input["http_request_1"]
if not response["success"]:
return {"error": f"API returned {response['statusCode']}"}
if "data" not in response["body"]:
return {"error": "Missing data field in response"}
return {"success": True, "data": response["body"]["data"]}
```
## Tips
Use the built-in request tester to debug API calls before adding them to your workflow. Click "Test Request" in the configuration panel.
For APIs with complex authentication (OAuth 2.0 flows), consider using External API if the service is supported, or handle token refresh in a separate workflow.
Be careful with sensitive data in URLs - query parameters may be logged. Use headers or request body for sensitive values.
## Settings
What to call this node (shown on the canvas).
A short code to reference this node's response.
What type of request to make:
* **GET** - Retrieve data (like loading a webpage)
* **POST** - Send data (like submitting a form)
* **PUT/PATCH** - Update existing data
* **DELETE** - Remove data
The web address to connect to. You can include data from previous nodes.
Extra information to send with the request (often needed for login credentials).
Values to add to the web address (like `?search=hello`).
The data to send (when using POST, PUT, or PATCH).
What format the data is in: `json` (most common), `form`, `raw`, or `none`.
How to log in:
* **none** - No login needed
* **bearer** - Use a token (common for modern services)
* **basic** - Use a username and password
* **apiKey** - Use a special key
How long to wait (in milliseconds) before giving up. 30000 = 30 seconds.
Whether to automatically follow if the site redirects you somewhere else.
How many times to try again if it fails.
## Outputs
The data that came back (the main response).
A number showing if it worked:
* **200** = Success
* **404** = Not found
* **500** = Something went wrong on their end
Extra information that came with the response.
True if it worked, false if not.
How long it took (in milliseconds).
## Related Nodes
Simpler interface for 600+ integrated apps.
For complex request/response processing.
## When to Use
* **Services not in the app list** - Connect to any website or service
* **Your company's systems** - Connect to internal tools and databases
* **Advanced connections** - When you need precise control over how you connect
* **Sending data** - Push information to other systems
If you're connecting to Gmail, Slack, Google Sheets, or other popular apps, use [App Action](/nodes/actions/app-action) instead - it's much easier to set up.
## Example: REST API Integration
Query a customer API and process the results:
Add an HTTP Request node:
* Method: **GET**
* URL: `https://api.example.com/customers/{{webhook_1.body.customerId}}`
* Headers:
```json theme={null}
{
"Authorization": "Bearer {{secrets.API_KEY}}",
"Accept": "application/json"
}
```
Add a Condition node to check success:
```
{{http_request_1.statusCode}} == 200
```
Access response data in subsequent nodes:
```
Customer name: {{http_request_1.body.name}}
Email: {{http_request_1.body.email}}
Account tier: {{http_request_1.body.subscription.tier}}
```
## Example: POST with JSON Body
Create a record in an external system:
**Configuration:**
* Method: **POST**
* URL: `https://api.example.com/leads`
* Body type: **json**
* Body:
```json theme={null}
{
"name": "{{webhook_1.body.name}}",
"email": "{{webhook_1.body.email}}",
"source": "cogniagent_workflow",
"metadata": {
"campaign": "{{webhook_1.body.campaign}}",
"timestamp": "{{timestamp}}"
}
}
```
## Example: GraphQL Query
Query a GraphQL API:
**Configuration:**
* Method: **POST**
* URL: `https://api.example.com/graphql`
* Headers:
```json theme={null}
{
"Content-Type": "application/json",
"Authorization": "Bearer {{secrets.GRAPHQL_TOKEN}}"
}
```
* Body:
```json theme={null}
{
"query": "query GetUser($id: ID!) { user(id: $id) { name email orders { id total } } }",
"variables": {
"id": "{{webhook_1.body.userId}}"
}
}
```
**Accessing the response:**
```
Name: {{http_request_1.body.data.user.name}}
Order count: {{http_request_1.body.data.user.orders.length}}
```
## Example: File Upload
Upload a file using form data:
**Configuration:**
* Method: **POST**
* URL: `https://api.example.com/upload`
* Body type: **form**
* Body:
```json theme={null}
{
"file": "{{parse_file_1.fileContent}}",
"filename": "report.pdf",
"description": "Generated report"
}
```
## Logging In (Authentication)
Different services require different ways to prove you're allowed to connect.
### Using a Token (Most Common)
Many modern services give you a token - a long string of characters - to prove who you are:
```json theme={null}
{
"type": "bearer",
"token": "{{secrets.API_TOKEN}}"
}
```
### Using Username and Password
Some older services use traditional login:
```json theme={null}
{
"type": "basic",
"username": "{{secrets.API_USER}}",
"password": "{{secrets.API_PASS}}"
}
```
### Using an API Key
Some services give you a special key instead of a token:
```json theme={null}
{
"type": "apiKey",
"key": "X-API-Key",
"value": "{{secrets.API_KEY}}",
"in": "header"
}
```
## Error Handling
Always check the response status:
```
├── HTTP Request
├── Multi-Condition (based on statusCode)
│ ├── 200-299: Continue normal flow
│ ├── 400: Update Variable (bad request error)
│ ├── 401: External API (refresh token) → Retry
│ ├── 429: Pause (30s) → Retry
│ └── 500+: External API (alert team)
```
**Simple success check:**
```
├── HTTP Request
├── Condition (success == true)
│ ├── Met: Continue
│ └── Unmet: Handle error
```
## Response Parsing
### JSON (automatic)
If the response has `Content-Type: application/json`, it's automatically parsed:
```
{{http_request_1.body.data.items[0].name}}
```
### Raw Text
For non-JSON responses, body is a string:
```
{{http_request_1.body}}
```
Parse it in an Execute Code node if needed.
### Binary/Files
For binary responses, the body contains base64-encoded data. Use Execute Code to process.
## Retry Configuration
Configure retries for transient failures:
```json theme={null}
{
"maxRetries": 3,
"retryDelay": 1000,
"retryOn": [429, 500, 502, 503, 504]
}
```
Retries use exponential backoff by default: 1s, 2s, 4s...
## Best Practices
### Use Variables for URLs
```
# Good - configurable
https://{{env.API_HOST}}/api/v2/customers
# Avoid - hardcoded
https://api.production.example.com/api/v2/customers
```
### Store Secrets Securely
Never hardcode API keys in the URL or body. Use workspace secrets:
```
Authorization: Bearer {{secrets.MY_API_KEY}}
```
### Handle Rate Limits
Check for 429 status and implement backoff:
```
├── HTTP Request
├── Condition (statusCode == 429)
│ ├── Met: Pause ({{http_request_1.headers.retry-after * 1000}}) → Loop back
│ └── Unmet: Continue
```
### Validate Responses
Don't assume success. Check status codes and validate expected fields:
```python theme={null}
# In Execute Code node
response = input["http_request_1"]
if not response["success"]:
return {"error": f"API returned {response['statusCode']}"}
if "data" not in response["body"]:
return {"error": "Missing data field in response"}
return {"success": True, "data": response["body"]["data"]}
```
## Tips
Use the built-in request tester to debug API calls before adding them to your workflow. Click "Test Request" in the configuration panel.
For APIs with complex authentication (OAuth 2.0 flows), consider using External API if the service is supported, or handle token refresh in a separate workflow.
Be careful with sensitive data in URLs - query parameters may be logged. Use headers or request body for sensitive values.
## Settings
What to call this node (shown on the canvas).
A short code to reference this node's response.
What type of request to make:
* **GET** - Retrieve data (like loading a webpage)
* **POST** - Send data (like submitting a form)
* **PUT/PATCH** - Update existing data
* **DELETE** - Remove data
The web address to connect to. You can include data from previous nodes.
Extra information to send with the request (often needed for login credentials).
Values to add to the web address (like `?search=hello`).
The data to send (when using POST, PUT, or PATCH).
What format the data is in: `json` (most common), `form`, `raw`, or `none`.
How to log in:
* **none** - No login needed
* **bearer** - Use a token (common for modern services)
* **basic** - Use a username and password
* **apiKey** - Use a special key
How long to wait (in milliseconds) before giving up. 30000 = 30 seconds.
Whether to automatically follow if the site redirects you somewhere else.
How many times to try again if it fails.
## Outputs
The data that came back (the main response).
A number showing if it worked:
* **200** = Success
* **404** = Not found
* **500** = Something went wrong on their end
Extra information that came with the response.
True if it worked, false if not.
How long it took (in milliseconds).
## Related Nodes
Simpler interface for 600+ integrated apps.
For complex request/response processing.