> ## Documentation Index
> Fetch the complete documentation index at: https://docs.cogniagent.ai/llms.txt
> Use this file to discover all available pages before exploring further.
# Webhook Node
> Run your workflow when another app or website sends you data
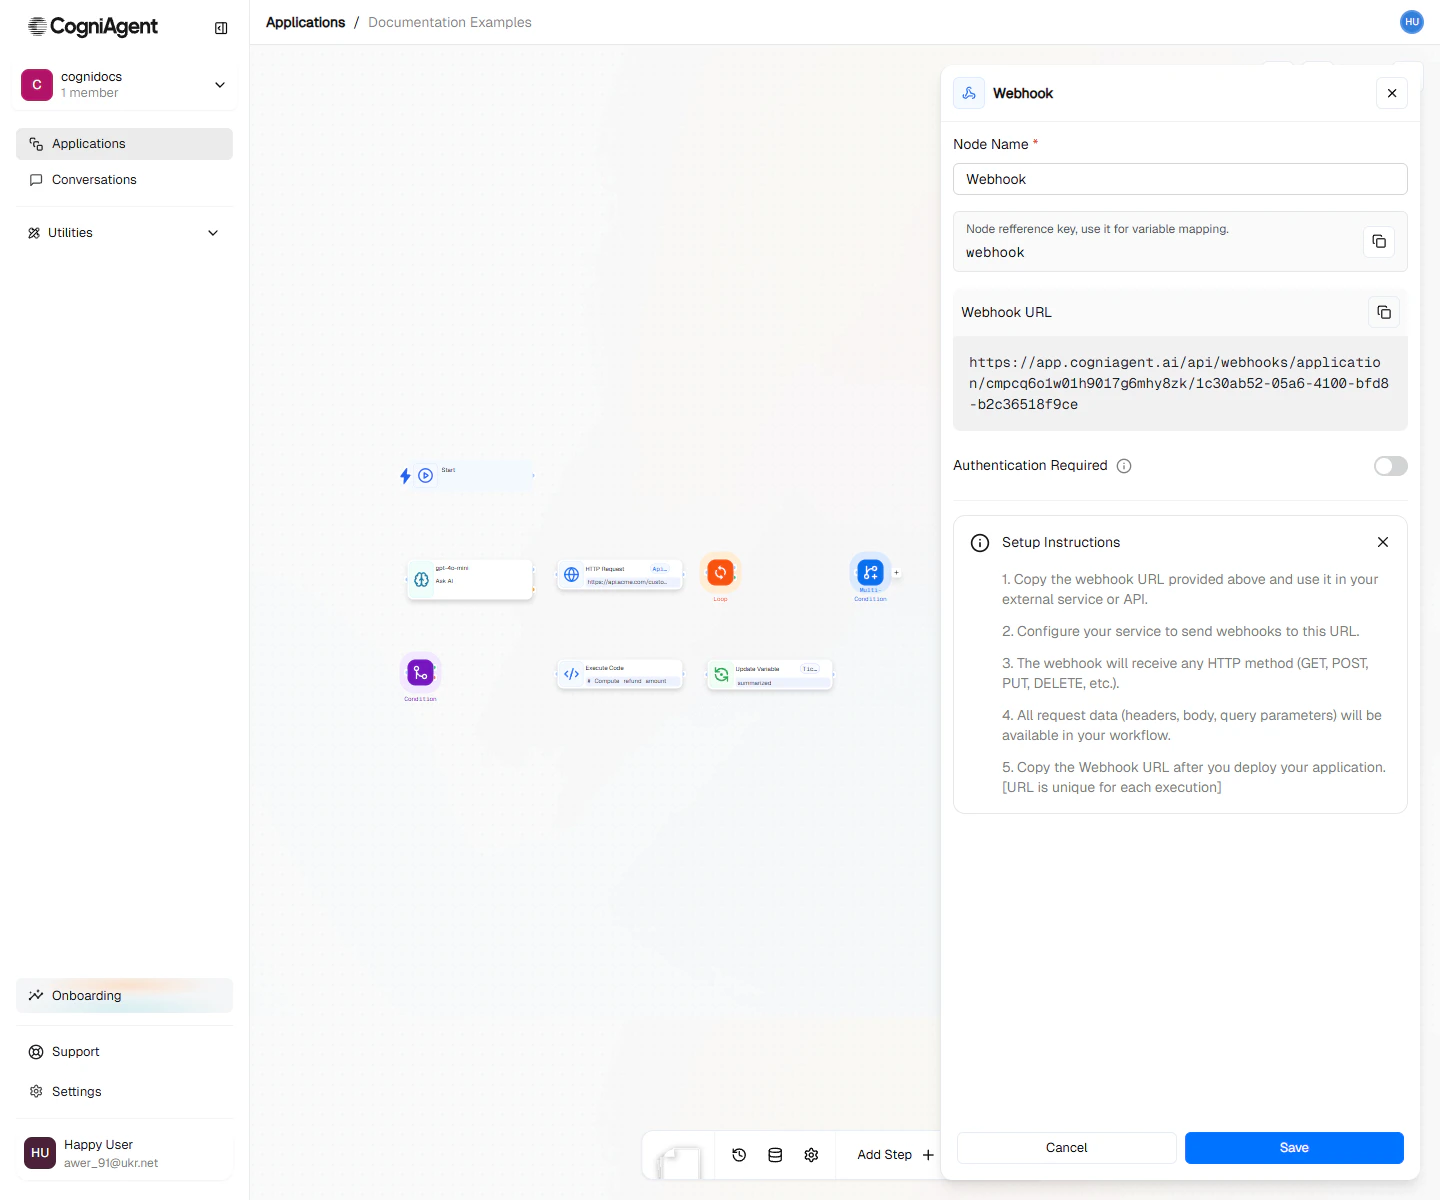
A webhook is like a special web address that listens for incoming data. When someone (or something) sends data to this address, your workflow starts.
Think of it like a mailbox: other apps and websites can "drop off" information, and your workflow automatically processes it.
 ## When to Use
* **Form submissions** - When someone fills out a form on your website, Typeform, or survey
* **Connecting other apps** - When apps like Zapier or Make need to trigger your workflow
* **Your own software** - When your website or app needs to kick off a workflow
* **Automation platforms** - When you want to connect tools that aren't directly integrated
## Getting Your Webhook Address
After adding a Webhook node:
1. Save your workflow
2. Click the Webhook node to see its settings
3. Copy the web address from the **Webhook URL** field
This is the address other apps will send data to. It looks something like:
```
https://app.cogniagent.ai/webhooks/your-workspace/your-app/webhook_1
```
Your workflow must be **running** for the webhook to work. If your workflow is stopped, the webhook won't accept any data.
## Example: Form Submission Handler
Process contact form submissions and send them to your team:
Add a Webhook node configured for POST requests.
Connect to an Ask AI node that categorizes the inquiry:
```
Categorize this contact form submission into one of:
Sales, Support, Partnership, Other
Name: {{webhook_1.body.name}}
Email: {{webhook_1.body.email}}
Message: {{webhook_1.body.message}}
```
Use a Multi-Condition node to route based on the AI's categorization, sending notifications to different Slack channels.
### Expected Request Body
```json theme={null}
{
"name": "Jane Smith",
"email": "jane@example.com",
"message": "I'm interested in your enterprise plan...",
"source": "website"
}
```
### Calling the Webhook
```bash theme={null}
curl -X POST https://app.cogniagent.ai/webhooks/ws_123/app_456/webhook_1 \
-H "Content-Type: application/json" \
-d '{"name": "Jane Smith", "email": "jane@example.com", "message": "Hello!"}'
```
## Example: GitHub Integration
Trigger a workflow when new issues are created:
```
Workflow: GitHub Issue Triage
├── Webhook (receives GitHub webhook payload)
├── Condition (check if action is "opened")
├── Ask AI (analyze issue and suggest labels)
└── HTTP Request (add labels via GitHub API)
```
Configure GitHub to send webhooks to your endpoint for issue events.
## Response Modes
### Immediate Response
Returns immediately with a confirmation:
```json theme={null}
{
"success": true,
"executionId": "exec_abc123"
}
```
Use this when the caller doesn't need to wait for results.
### Last Node Response
Waits for the workflow to complete and returns the output of the final node. Use this when:
* The caller needs the processed result
* Building synchronous API integrations
* Forms that should display a confirmation message
Last node response mode has a timeout. For long-running workflows, use immediate mode and provide a callback webhook or polling endpoint.
## Keeping Your Webhook Secure
Anyone who knows your webhook URL can send data to it. Implement validation for production workflows.
* **Validate incoming data** - Check that requests contain expected fields before processing
* **Use a webhook secret** - Include a secret token in requests and verify it in your workflow
* **Rate limiting** - CogniAgent includes built-in rate limiting to prevent abuse
### Using a Webhook Secret
Require a secret token to verify requests are legitimate:
```
# In a Condition node, verify the secret:
{{webhook_1.headers.x-webhook-secret}} equals "{{secrets.WEBHOOK_SECRET}}"
```
Only continue the workflow if the secret matches. Store your secret in workspace secrets, not in the workflow.
## Tips
Use query parameters for metadata that doesn't change per request, and the body for variable data. Example: `?source=website&version=2`
Test webhooks locally using tools like [ngrok](https://ngrok.com) or [webhook.site](https://webhook.site) before connecting production systems.
## Settings
What to call this node (shown on the canvas).
A short code to reference this node's data.
How data is sent to you. Usually POST (the default) works fine.
What to send back to whoever triggered the webhook:
* **immediate** - Say "got it!" right away
* **lastNode** - Wait for the workflow to finish, then send back the result
## Outputs
The main data that was sent (form fields, JSON data, etc.).
Extra information that came with the request (usually not needed).
Values from the web address (like `?userId=123` gives you `userId: "123"`).
How the data was sent (GET, POST, etc.).
## Related Nodes
Make outgoing HTTP requests to other services.
Validate webhook data before processing.
## When to Use
* **Form submissions** - When someone fills out a form on your website, Typeform, or survey
* **Connecting other apps** - When apps like Zapier or Make need to trigger your workflow
* **Your own software** - When your website or app needs to kick off a workflow
* **Automation platforms** - When you want to connect tools that aren't directly integrated
## Getting Your Webhook Address
After adding a Webhook node:
1. Save your workflow
2. Click the Webhook node to see its settings
3. Copy the web address from the **Webhook URL** field
This is the address other apps will send data to. It looks something like:
```
https://app.cogniagent.ai/webhooks/your-workspace/your-app/webhook_1
```
Your workflow must be **running** for the webhook to work. If your workflow is stopped, the webhook won't accept any data.
## Example: Form Submission Handler
Process contact form submissions and send them to your team:
Add a Webhook node configured for POST requests.
Connect to an Ask AI node that categorizes the inquiry:
```
Categorize this contact form submission into one of:
Sales, Support, Partnership, Other
Name: {{webhook_1.body.name}}
Email: {{webhook_1.body.email}}
Message: {{webhook_1.body.message}}
```
Use a Multi-Condition node to route based on the AI's categorization, sending notifications to different Slack channels.
### Expected Request Body
```json theme={null}
{
"name": "Jane Smith",
"email": "jane@example.com",
"message": "I'm interested in your enterprise plan...",
"source": "website"
}
```
### Calling the Webhook
```bash theme={null}
curl -X POST https://app.cogniagent.ai/webhooks/ws_123/app_456/webhook_1 \
-H "Content-Type: application/json" \
-d '{"name": "Jane Smith", "email": "jane@example.com", "message": "Hello!"}'
```
## Example: GitHub Integration
Trigger a workflow when new issues are created:
```
Workflow: GitHub Issue Triage
├── Webhook (receives GitHub webhook payload)
├── Condition (check if action is "opened")
├── Ask AI (analyze issue and suggest labels)
└── HTTP Request (add labels via GitHub API)
```
Configure GitHub to send webhooks to your endpoint for issue events.
## Response Modes
### Immediate Response
Returns immediately with a confirmation:
```json theme={null}
{
"success": true,
"executionId": "exec_abc123"
}
```
Use this when the caller doesn't need to wait for results.
### Last Node Response
Waits for the workflow to complete and returns the output of the final node. Use this when:
* The caller needs the processed result
* Building synchronous API integrations
* Forms that should display a confirmation message
Last node response mode has a timeout. For long-running workflows, use immediate mode and provide a callback webhook or polling endpoint.
## Keeping Your Webhook Secure
Anyone who knows your webhook URL can send data to it. Implement validation for production workflows.
* **Validate incoming data** - Check that requests contain expected fields before processing
* **Use a webhook secret** - Include a secret token in requests and verify it in your workflow
* **Rate limiting** - CogniAgent includes built-in rate limiting to prevent abuse
### Using a Webhook Secret
Require a secret token to verify requests are legitimate:
```
# In a Condition node, verify the secret:
{{webhook_1.headers.x-webhook-secret}} equals "{{secrets.WEBHOOK_SECRET}}"
```
Only continue the workflow if the secret matches. Store your secret in workspace secrets, not in the workflow.
## Tips
Use query parameters for metadata that doesn't change per request, and the body for variable data. Example: `?source=website&version=2`
Test webhooks locally using tools like [ngrok](https://ngrok.com) or [webhook.site](https://webhook.site) before connecting production systems.
## Settings
What to call this node (shown on the canvas).
A short code to reference this node's data.
How data is sent to you. Usually POST (the default) works fine.
What to send back to whoever triggered the webhook:
* **immediate** - Say "got it!" right away
* **lastNode** - Wait for the workflow to finish, then send back the result
## Outputs
The main data that was sent (form fields, JSON data, etc.).
Extra information that came with the request (usually not needed).
Values from the web address (like `?userId=123` gives you `userId: "123"`).
How the data was sent (GET, POST, etc.).
## Related Nodes
Make outgoing HTTP requests to other services.
Validate webhook data before processing.